Monday, December 19, 2016

Old World Gingerbread House and Snow Queen Scarf


Food is an important part of the holidays for me.  It's not like that for everyone.  I've actually met people who don't recall any special food from their childhood associated with the holidays other than that they had a turkey dinner.  My Steve is one of those people.  It's taken us a long time but after 30 years together we've come up with some wonderful food traditions for our holidays and without a doubt building a gingerbread house at Christmas is at the top of our list.

The origins of our tradition began with a trip to Chile many years ago and our stay at the Hyatt Hotel in Santiago where in lobby they had an actual gingerbread house (made of cookie dough and frosted) that you could walk inside and from which they sold individual gingerbread houses and cookie boxes. During our stay we consumed several of these delicious houses in an embarrassingly short period of time and have been left wanting more ever since.


And it remained just a wistful reminiscence until Steve suggested that we try making our own gingerbread house.  And so we did.  With a success that has left us giddy with delight and has amused us in the process more than I can say. There is something very fun about frosting and decorating a gingerbread house that will bring out the kid in everyone. Just you wait and see.

The most important part of making a gingerbread house is to use a wonderfully rich and flavorful gingerbread  because a large part of the fun is eating the house.  And when I thought about it I realized that I already had the perfect recipe that I had been using to make gingerbread men for many years. This recipe works beautifully to construct a gingerbread house and makes exactly the right quantity and it is so so so much better frosted and coated in candy!


A couple of housekeeping points before I get to the recipe.  It's best to plan on making your gingerbread house over two days, although it can be made in one.  I recommend that on the first day you make the gingerbread dough, let the dough chill, and bake the individual house pieces.  On the second day you can make the royal icing and decorate the house.  I like to ice the entire house as it will keep the gingerbread fresh and tastes wonderful.

Old World Gingerbread House Recipe ~

Gingerbread Dough:

1 C. shortening
1/2 tsp. salt
3 tsp. baking soda
2 tsp. ginger
2 tsp. cinnamon
1 tsp. ground cloves or allspice
(note: if you like a lot of spice you can increase the ginger and cinnamon by 1 tsp and and the cloves by 1/2 tsp.)
1 C. granular sugar
1 C. molasses
2 beaten eggs
1 tsp. instant coffee moistened in a little hot water (I use espresso powder)
5 C. All purpose flour

Royal Icing:

1 lb. sifted confectioners sugar
3 egg whites
1 Tbs fresh lemon juice or 1/2 tsp. cream of tartar

Suggested Decorations:

Candy Canes (You can use them whole or crush them for sprinkles)
gum drops
skittles (original soft style work best)
multi-colored sprinkles and sugars
Avoid unwrapped hard candies that will melt in the frosting

DAY 1 ~

Prepare the Dough Steps:
1. Cream first 6 ingredients;
2. Cream in sugar and molasses;
3. Add in beaten eggs and coffee (or espresso);
4. Add flour 1 cup at a time. After adding 3 cups stir in the last 2 cups by hand.
5. Allow dough to chill in the refrigerator several hours or until it's easy to handle.

Baking Steps:

1.  Preheat oven to 325 to 340 degrees (I generally preheat to 340 degrees) and prepare baking sheets by covering with parchment paper or silplat.
2.  While oven preheats download a gingerbread house template.  I highly recommend the free King Arthur Template. I divide the dough into half and I use a full half of the dough to make the 2 sides of the house.  I then divide the remaining dough into 4 pieces to create the roof (2 pieces) and the ends (2 pieces).  You want to divide the dough like this so that you use all your dough and that way you know your house is of the right thickness.  I typically have only enough scraps left over to make a small gingerbread man.  This style of gingerbread is meant to be thick and if it is too thin it will be dry and not as enjoyable to eat.

3.  Bake approx. 18-20 minutes (with my oven I generally preheat to 340 degrees and bake for 18 minutes) and cool on a wire rack.  You can then proceed to setting up and decorating your house or wrap the pieces well (air tight) if you plan on decorating the next day. If you intend to wait longer than a day to decorate I would freeze the house pieces until you are ready to keep them as fresh as possible.

DAY 2 ~

1.  Prepare a surface to construct your house.  I like to use a cutting board but any flat surface will work.  Lay out your gingerbread house pieces and find some soup cans that can be used to stabilize the house while it sets.  Before preparing your icing review the entire King Arthur Template for tips on how to set up your house.

2.  Preparing Royal Icing as follows*:  whip eggs whites until creamy and add either lemon juice or cream of tartar. Then add powdered sugar and whip until soft peaks form.  At this point I recommend you remove 3/4s of the icing and place into a sealed plastic bag (sealing the plastic bag will keep the icing soft) to use later for icing the house.  The remaining 1/4 amount of icing should be whipped until stiff peaks form (the longer you whip it the faster the icing will set and the harder it will dry). This firmer and fast setting icing is used to set up your house.  Scoop this icing into a small plastic bag and make a small cut in one corner which can be used to pipe out the icing as needed. Now follow the assembly steps in the King Arthur Template.  Once your house is assembled allow it to set 2 to 3 hours (or until firm) before icing and decorating.

3.  When your house is set use the icing you set aside earlier to ice all surfaces (icing all surfaces will keep the gingerbread fresh longer) and quickly decorate before the icing sets.

4.  Allow decorated house to set for a minimum of 8 to 12 hours (the longer setting time is needed because you are using a softer icing which is more enjoyable to eat that the firm icing used to set up the house).

*Alternative icing options:  1)  You can make two batches of icing.  The first batch (whipped until firm peaks) can be used to set up the house and the second batch (whipped to soft peaks) can be used to ice and decorate the house; 2)  If you are pressed for time you can simply use the firmer icing to both set up the house and decorate the house, but I don't recommend this as the firmer icing isn't as enjoyable to eat as the softer icing.

I hope this will become part of your family Christmas holiday traditions!

Adapted from Yankee Magazine recipe for Gingerbread Gentlemen (1993 issue).

Snow Queen Scarf


Before it gets lost in the shuffle I wanted to quickly share this scarf knit in a thick opulent combination of silk and wool, that makes me feel positively queenly when I wear it!  I purchased this yarn as a club offering several years ago from The Verdant Gryphon and the designer/dyer took her inspiration from The Snow Queen, one of Hans Christan Anderson's well known fairy tales. Although not nearly as well known as The Little Mermaid.  If you are not familiar with his work, all of his fairy tales are sad but they are beautifully told to reveals how through acts of kindness or selflessness anyone no matter how far they have fallen or how lowly they are in this world can achieve redemption. A thought provoking and interesting subject to explore no matter your age and is one reason his stories are worth telling and retelling through the ages.

While I chose not to use the design that came with this club offering I absolutely love the yarn and am also glad that I have the beautifully illustrated copy of The Snow Queen that came with it.  As always these clubs are risky as you have no idea what color, pattern and notions will be sent.  That being said I have rarely been disappointed in a yarn club.

Particulars:  Saroyan (free pattern) designed by Liz Abinante (Feministy.com); US 9 needles; 2 skeins The Verdant Gryphon, Codex (worsted 52% silk/ 48%wool 234 yds/113g per skein).  My only modification was to use 2 colors instead of a solid color.  To knit this using 2 colors simply twist the yarns intarsia style.  To maximize the amount of the light blue color I knit the entire edging in the contrasting color instead of simply the leaf.  Lightly blocked dimensions 66" x 10" (at widest point).

Wishing You a Merry Christmas ~


With the success of his calendar shot Simcha announced that he's available for kisses and autographs. For a price. Le sigh, despite our best efforts he still has a working dog mentality.

Until next time be well and love well and from all of us at The Knitting Blog by Mr. Puffy the Dog, we wish you a very Merry Christmas and Happy New Year!
Tuesday, December 6, 2016

Jolly Christmas Socks ~

This year I've stepped up early and have already begun my holiday decorating.  I sort of had to as we are going away for Christmas and if I didn't decorate early there wouldn't be any decorating at all. And where's the fun in that?  In general though, it is my preference to decorate closer to the holiday and then enjoy the decorations through New Year's Day. I'm old school that way.  And in probably lots of other ways as well.


So ho-ho-ho here I am wearing my Christmas Stockings.  That I absolutely love.  Unseemingly so, given my age. And in full candor they are knit in a light fingering yarn so probably won't wear well at all. What was I thinking?  I should know better than this.  But don't I look like a cute elf wearing them?


I did not use a pattern for these socks.  After my last post on being a self confessed "pattern hog" I felt the need to say that.  I simply used my favorite sock techniques to create these "so not your basic sock" socks.  When knitting with a hand dyed yarn it's all about knowing when to back off and let the yarn itself shine, jingle and two step into the limelight.  Anyone care to do-si-do?  No?  Perhaps after you've had a spiked eggnog or two. Shoes are optional. Especially when you have super cool socks on.

This is just a quick post because I'm hoping to have a Christmas post up before we leave on our Christmas break. But in case that doesn't happen (it requires delicate timing and participation by Steve) and I'm gone until after Christmas I wanted to leave you with a message that I hope will resonate with everyone everywhere no matter what side of the aisle or ocean you are on.  It's a wish for peace on earth and goodwill toward all mankind.


Particulars:  There is no pattern.  I simply used a combination of my favorite sock techniques.  I actually plan on writing up a sock pattern in the Spring so stayed tuned if you are a new sock knitter and are looking for a good basic sock pattern.  I used LYDIA sock yarn; 460 yrds/100g light fingering (75% merino /% nylon) in the colorway "Tis the Season," purchased with a mini contrasting green sock yarn.  I actually have 60 grams of the main color left over which is enough for another pair of socks so long as I use a contrasting cuff, heel, and toe yarn again.  I really enjoyed knitting with this yarn and colorway but recommend that you use a bright contrasting color as I did to bring it to life.

I love knitting socks and this blog abounds with them.  Here's some links to socks previously featured on the blog: Orzivals; Sock Love; Embossed Leaf; Cabled Rib Socks; Knee High Socks; Smaug; Ripple Effect; Kelmscott; Halloween Goth; Monkey Socks; Basket Weave Socks; Dublin Bay; Serpentine Socks; Bird of Paradise socks (featuring Mr. Puffy, bless his heart) and there are others too but this gives a good selection of different patterns.  Of these I believe the Dublin Bay and Orzival are free patterns.

Until next time be well, love well and have a jolly time decorating for the holidays!

Saturday, November 26, 2016

Tapping into Your Creative Process and Farewell to Fall


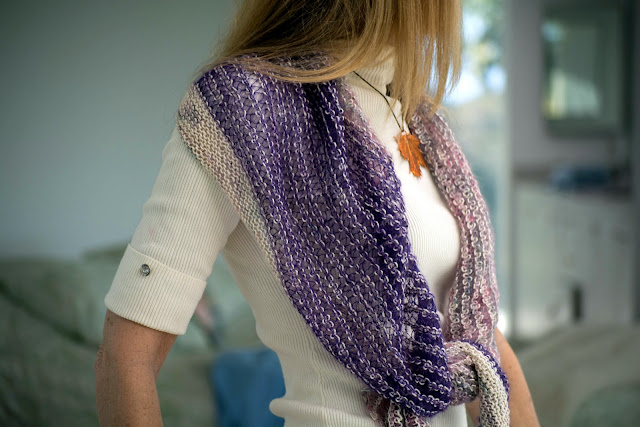
I am wearing a shawl that I knit for the holidays using a combination of silk and kidsilk haze yarn.  I didn't technically use a pattern.  Instead it's a mashup of two designs, one of which I used for its shaping and the other for its twisted drop stitch technique. Before I began blogging and bedazzled by all the amazing knitting online I used to be much more creative and less dependent on using patterns. I'm afraid I've become what I overheard a LYS owner refer to as a "pattern hog." I had no clue what she meant and asked her to explain.  She told me that it's someone who sees and likes a design and immediately buys the pattern and thereby accumulates a library of patterns that they intend to knit. Someday.  And so their library grows and morphs until it contains patterns beyond a reasonable hope of ever being knit.


She further explained that knitters as a whole used to be much less dependent on patterns. And I realized that she was describing me.  It's so tempting to relax and follow someone else's pattern.  I figure why reinvent the wheel?  I like the design and someone else has already figured out the hard part.  But this limits your own creativity.  There is something very satisfying about buying yarn and imagining what it can become and then creating it.

To begin your journey of creativity you might consider doing what I've done with this shawl which is to borrow design elements from patterns that you already own to create something that's uniquely yours. You might find that you have a knack for designing.  Or at least become less dependent on patterns.  Not that there's anything wrong with that.


I usually don't wear anything that I've knit until I've taken the pictures and blogged the project.  But I cheated with this shawl as it was perfect to wear for an occasion we went to several weeks ago.  I'm a fan of period pieces a la Jane Austen and it was not uncommon in that era to listen to chamber music in the evening after dinner in private residences. So imagine my delight to be invited to a friend's house for dinner to be followed by a chamber music concert!  For me it just doesn't get better than this and I just had to wear my new shawl.  It truly was a memorable evening.  You can't imagine how the soul soars to hear the sweet notes of the violin and cello being played so close that you can see the music flowing through the musician and the instrument as if they were one.  It's a connection that is beautiful to witness. Someone took a video of the music, but alas it can not capture being there.  I told our host as we were leaving that I'm hoping next time they'll clear the floor for waltzing. I think technically what I was asking for was a Ball.  Just call me Lydia.


Particulars:  Mashup of Two Patterns: I used the sideways triangle (elongated) shaping for this shawl from Enfilade by Lisa Hannes and I used the twisted drop stitch technique from the Mulberry shawl from Colinette's Arboretum pattern collection (the twisted drop stitch creates the wonderful squiggles in the silk and mohair best seen in the second picture from the top); I used 2 skeins Colinette Tao Silk; 1 skein Rowan Kidsilk Haze (dark purple); and 1 skein Colinette Parisienne Kid Mohair; US 6 needles.  The original Enfilade shawl is blogged as Multi Colored Shawls and Testing Yarn for Color fastness and I previously knit a hat from the Arboretum collection blogged as It's an Art, not Science.

Incidentally the pendant that I'm wearing in these pictures is an actual maple leaf that has been dipped in copper.  I purchased it from Shy Faerie on Etsy and have loved wearing it this season.  She has silver ones for Winter too and I'm thinking about getting one of those as well!  Talk about being creative using limited resources.  These are only $8.99 US amazingly and I think would be a great stocking stuffer and/or add on gift for holiday shopping.

Farewell to Fall ~

It might not technically be the end of Fall but after Thanksgiving it seems we all rush into the Christmas season.  This weekend I'm trying to savor the last remnants of Autumn with every bite of pumpkin pie.  It's been a particularly nice Thanksgiving and I'm feeling very blessed to have Steve and Simcha to share this special time and to have such a wonderful extended family.  I'm grateful for that every day.


Until next time be well, love well and have fun decorating and preparing for the Christmas holiday season!

Friday, November 18, 2016

Honey and Butter baked Pears and a Super Soft Kidsilk Scarf ~

Thanksgiving is the perfect time to slow down and appreciate the simple things in life.  It's a time to reconnect with family and friends, share the bounty of our table and remember all the many blessings and wonderful things that we have.  Sometimes the beauty of this holiday can be lost with all the stress of shopping and cooking and trying to create the perfect holiday experience.  That sadly misses the point.  What really matters is spending time together and recognizing that we have many things to be grateful for and that requires shutting out the noise and distractions that keep us from being fully present for others and contemplating who we are and what matters to us.  This is a perfect time to savor the simple pleasures in life and to that end I am sharing a very easy to make dessert that celebrates seasonal fruit; is sophisticated enough to serve to company; and is the perfect ending to any meal.  It's pears baked in honey and butter and I think you will find it is a wonderful warm dessert for cold winter evenings.


I am sharing with you a reduced fat and sugar adaption of the original recipe by chef Paul Cunningham.  You can definitely increase the butter and honey to taste (do so in equal proportions up to 1/4 cup each). But I found that even using a small amount of butter and honey created a sufficient sauce to brown and baste the pears giving them a wonderful sticky texture and flavor.  Steve and I eat a health conscious diet although baking is an indulgence I usually don't skip the ingredients on.  But when I see a dessert recipe that looks easy to adapt to reduce the fat and sugar content I do. As you can see from the finished pictures these pears browned up and caramelized beautifully and with this version you won't break the calorie or cholesterol bank.


Honey and Butter Baked Pears 

Ingredients ~ 4 servings

4 Bosc Pears, peeled, halved, cored (leaving stem intact)
1 1/2 Tbs. unsalted butter - shaved and/or diced
1 1/2 Tbs. honey (for baking I typically use Turkish honey sold by Trader Joe. I find it similar in flavor to Tupelo honey)
2 to 3 fresh thyme sprigs
fresh Bay leaf (optional - I did not use any bay leaf)
maldon sea salt flakes or kosher salt
optional garnish: heavy cream, chilled creme fraiche, or vanilla ice cream

Steps:

1.  Preheat oven to 400 degrees Fahrenheit.

2.  Line roasting pan with parchment paper or silpat.  Arrange pears cut side up in a single layer on pan.  Evenly sprinkle top of pear halves with shaved butter and season lightly with crushed salt flakes. Scatter fresh thyme and bay leaf (optional) over pears and drizzle with honey.

3.  Bake pears, gently turning every 15 minutes to coat in butter and honey until tender and caramelized, for approximately 1 hour.  Transfer to warmed serving dish, drizzle with any pan juices, and serve warm with a jug of heavy cream, creme fraiche, scoop of vanilla ice cream or, for family style, serve plain.

Adapted from Chef Paul Cunningham's recipe in Saveur magazine using Anjou pears.


Super Soft Kidsilk Haze Scarf


I am a huge fan of kidsilk haze and every winter I knit at least one item in this luscious fiber.  It's one of those magical combination that someone somewhere discovered goes really well together.  Like peanut butter and jelly, Ginger Rodgers and Fred Astaire; sunsets and tropical beaches, kidsilk haze is one of those perfect pairings.  It has mohair for loft and warmth and silk for vibrancy and shine that is spun into an amazingly soft and warm lace weight yarn.  It's very addicting to knit with.  Some even call it kidsilk crack.  But knitting with kidsilk haze can be tricky too so I'm going to share with you my tips for knitting with this yarn.

Tips for knitting with kidsilk haze yarn:

1.  Be aware that it's almost impossible to fix a mistake in this yarn because the fibers cling together creating a snarl almost impossible to undo unless you are incredibly patient.  It is possible though, if you slowly undo one stitch at a time.  This is a technique called "tinking" (i.e. knitting spelled backwards).

2.  The yarn strand itself is very thin and it's a little like knitting with a fine thread surrounded by a halo of fibers.  It will be easier for you to pick up this inner yarn strand if you use sharp pointed needles.  Needles that have sharp points are called "lace" needles.

3.  Again, because the inner thread is so fine it is helpful to use a needle color that contrasts with the color of the yarn you are knitting.  This will make it easier to see the thread that you are knitting.

4.  Don't give up. Once you get the hang of knitting with this fiber you will be addicted too!  In a good way.

5.  This last tip is a late addition and comes courtesy of Selma who writes the blog Knitting New England (she's a great writer and knitter and I hope you watch for her posts updates on my sidebar)! Selma's tips is to place your knitting into a plastic bag and freeze it for a couple of hours.  Apparently mohair has a fairly high water content and freezing it helps the fibers unstick.

There you have it.  Now go forth and try Kidsilk haze yarn fearlessly.

Scarf Particulars:  Kidsilk Haze Stripe Scarf (in Kaffe Fassett selected colors); free pattern download on Rowan's website; designed by Marie Wallin; 1 skein Rowan Kidsilk Haze Stripe (460 yrds); US 8 needles.  I simply knit until I ran out of yarn (these skeins are very large - double a typical kidsilk haze skein) and my finished scarf measures: 68" x 10."  Some of my past kidsilk haze projects include: The Fleur Wrap; Trieste Shawl; Willowy ScarfAnisette Stole, Birch Shawl; and the Dove Shawl.

Until next time be well and love well and during this stressful holiday season slow down and enjoy simple pleasures such as easy baked pears or knitting a simple and soothing stockinette scarf.

I leave you with the beautiful music Hallelujah, composed and sung by Leonard Cohen a wonderful soul who will be greatly missed.  R.I.P. Leonard Cohen.

Sunday, November 6, 2016

The Circle Game and New Fall Favorites

I am wearing a circular shawl which is usually knit and used as a blanket, as indeed this one will be. But I wanted to show that it can also be worn as a shawl and that it makes an elegant cape.  This style of knitting is very old school and as much as I love the modern designs I have a strong love of period knitting because then you truly create something that can't be bought off the rack and you won't see everyone else wearing.  And as you get older, as I am, you will find that wearing garments that express your personality are the most complimentary. 


While this may look like a complicated knit, it really isn't.  The design is by Jared Flood and it was a pleasure to knit and practically flew off the needles.  The only (and very easily remedied) tricky part is the cast on which is a circular cast on.  I used the tutorial by Techknitting for the disappearing loop cast on and it may take an attempt or two but you will find that it does work and brilliantly so. 


The title of this post "The Circle Game" is a reference to the song by Joni Mitchell from her album Ladies of the Canyon.  Many people believe that the album title is a reference to Topanga Canyon (where I live) which was and still is a hippie enclave but it is actually Laurel Canyon that she is referring.  It's a song about time and its passing and how each of us pass through a variety of seasons in our life with everything being connected by a single point. Knitting helps me to feel connected to my family past (my father pictured below made 2 spinning wheels for his mother, my grandmother, that she used to make woolen socks and garments for her family living on a farm in Minnesota) and a tradition that has been practiced for centuries with timeless beauty and utility.  One reason I blog is to be part of the continuum of this tradition by sharing my projects and hopefully providing ideas and inspiration.


Particulars:  Girasole by Jared Flood (Brooklyn Tweed); Twisted Fiber Art yarn: Arial 1020 yrds (extra large evolution - colorway Vintage) + Petite Skein in Cork (120 yrds); US 5 needles.  Because I began with less yarn that the pattern recommends I used one size smaller needle than the pattern recommended and I also eliminated 1 pattern repeat of Chart E (i.e. I worked 2 repeats instead of 3 repeats of Chart E).  With these modifications I almost made it with the yarn I had but came up short by about 100 stitches left on the Bind Off.  Fortunately Twisted Fiber Arts has anticipated this problem and sells mini skeins that match each color on either end of the spectrum and so I was able to complete my bind off with a matching color.  Another Twisted Fiber Arts project can be found in my post Peach Cobbler and a Boo Knits Shawl which is supposedly the same yarn but feels a lighter weight.  If you would like to see another Brooklyn Tweed design I refer you to my recent sweater post featuring the Little Waves Sweater that I noticed Yarn Harlot also chose for her winter sweater.

A special thanks to my Dad for helping me show off this shawl!  He's a good sport in every way.  I'm looking forward to next weekend when we are taking my parents to see John Cleese, an English comedian, perform at the Arlington Theater in Santa Barbara!  My mom loves to laugh and being English I think that she will have a good time although I really don't know what to expect.

New Fall Favorites, of a food variety 

Apple Pie with Brown Butter Oat Streusel


So far this Fall I've made a few of my classic recipes (i.e. Pumpkin Bread with Walnut ToppingPumpkin Scones with Maple Glaze and a Nantucket Tart) but I've also discovered some new treats and the first is a streusel topped apple pie!  One bite and I knew I was in heaven.  The combination of brown sugar, apples and crunchy strudel topping is a winner in my book. I used the recipe from Bake from Scratch Magazine (November 28, 2016).  I did substitute my own pie crust recipe (shared below) and I also reduced the amount of butter and sugar in the filling and streusel but otherwise followed the recipe.  I did find that I had to bake mine a lot longer than the suggested recipe time but then I like my apples very soft in a pie.  If you love apple pie but aren't in the mood for streusel then you might try my classic apple pie recipe which Steve actually prefers.  While on the topic of pies, with Thanksgiving so near I'm drooling over the thought of our Thanksgiving day pumpkin pie that Steve has requested be made with a graham cracker crust this year.  Maybe I'll even bake a pecan pie too. So many pies and so little time!

Basic 9" Pie Crust (single)

1 1/4 Cups all purpose Flour
1/2 tsp. salt
1 Tbs. white sugar
1/4 Cup sweet (unsalted) butter - chilled
1/4 Cup Crisco vegetable shortening
Approx. 2-3 Tbs. ice cold water/white vinegar mixture (fill a small bowl with ice water and splash in some white vinegar to the mixture - you will be adding the water/vinegar mixture 1 Tbs. at a time until the dough forms)

Steps:

1. Combine flour, salt, and sugar.
2. Cut in butter and shortening.
3. Add water/vinegar mixture 1 Tbs. at a time. Use a fork to blend/mix just until the mixture forms a dough.
4. Divide dough in half and wrap each portion in wax paper – let rest in refrigerator while you prepare filling.

Bake according to pie filling instructions.

My other new treat this Fall was discovering how easy it is to make homemade soft pretzels!  I used a recipe that also came from the same November 2016 issue of Bake from Scratch (recipe provided free on their website) and they are amazing!!!  These are the real deal and you will love, love, love them! They remind me of the soft pretzels we had as children whenever we visited Solvang, California. They are usually sold with little pots of soft cheddar cheese topping for dipping, but as I didn't have any soft cheddar I tried them with goat cheese encrusted with black pepper, which was different but nice.  That being said next time I'm buying the soft cheddar cheese to go with them. The recipe calls for dark beer and I used a Belgium Blond ale (Leffe) which was a good choice. Other than that my only substitution was to use real pretzel salt instead of kosher salt and to make my pretzels smaller (16 instead of 8).  Try these you won't be sorry!


Until next time be well and love well and enjoy all the colors and flavors of this and every season of your life!   

Sunday, October 16, 2016

Fall Cowl and Matching Fingerless Mitts

Last year I didn't knit any fingerless mitts and so I really needed a new pair this year.  Over the years I've knit many pairs of fingerless mitts but I tend to give them away or Steve commandeers them. Which is a really nice thing about them.  They are fast to make and everyone wants a pair so they make great gifts.  And at least here in SoCal the stores don't carry them which makes them a unique gift as well.


But this pair is definitely for me.  After all I have the matching cowl so I can't give them away!  They are knit in the same yarn but the patterns are actually by different designers although they do interestingly enough share common design elements.  I knit the cowl first. I loved the pattern and the backstory that came with it.  The designer was inspired by the Siskiyou mountain range which is one of the highest ranges between Oregon and California. Apparently after being caught on the wrong side of the mountain pass she was inspired to design this cowl decorated with diamond shaped edging reminiscent of the mountains; tire tracks plowing through the snow; and forked tree branches lining the way.

It was pure serendipity that the mitt pattern shared the same cabled edging running along the inner seam (the tire tracks if you will).  I purchased this mitt pattern last year intending to use a different yarn but after I finishing the cowl Steve suggested that I should use my leftover yarn for a pair of mitts. Which I thought was a very insightful suggestion for a non-knitter.  It's times like these that I realize he's paying more attention to what I'm doing or saying than I realize.  Note to self: you don't have as much privacy as you think when you live with someone.


Work has been particularly beastly but I still made time to decorate my house for Halloween. I do have my priorities! From now until New Years our house will be decorated for the various holidays and I'm always sad when the last ornament is put away.  It creates such a fun and festive feel in the house when it's decorated and many of the decorations I've made myself over the years.  For example the cat I'm holding in the first picture is a "prim" a form of American folk art that I made a few years ago (blogged as An Accessory Shawl and Halloween Prims).  I love these little cats and they have held up really well.  If you are looking for a quick and fun Halloween projects I recommend exploring prims! There are lots of kits and project ideas on Etsy. And many of my past October posts have Halloween project and recipes ideas as well.


Cowl Particulars:  Siskiyou Cowl, designed by Kelli Slack aka: Knitter Bunny (Kelli Slack Designs); US 4 needles; 1.1 skein of Swans Island superwash sport yarn (colorway Pesto);  My only modification was to knit only 18 pattern repeats rather than 21 as I wanted a shorter cowl for this set. I love this cowl, yarn and colorway!  I purchased this is a kit from Black Sheep at Orenco a sweet LYS in Oregon with lots of kits and project ideas.

Mitt Particulars: Qwist Mitts, designed by Melanie Berg (a designer better known for her shawls); US 4 needles; less than 1 skein of Swans Island superwash sport yarn (colorway Pesto); I knit the small size and my only modification was to BO in pattern rather than follow the pattern instructions for BO (which resulted in a floppy edge). Wonderful pattern.

A Haunted House


It's actually not a haunted house.  It's our house but I think it looks sufficiently creepy on a stormy night to be haunted!  Haunted or not with Autumn comes shorter days as darkness settles early and this makes it a wonderful time to be at home ensconced somewhere with a good book.  And a cup of tea.  And a freshly baked treat.  If that doesn't move you I recently read that good literature will actually increase your life span.  Whether or not that's true reading books will indubitably enhance your quality of life.  But the word "literature" packs a wallop as classic literature can be heavy reading.  By contrast trashy novels make such enticingly easy reads and can be consumed as quickly as a bowl of popcorn but never leave you satisfied.  Somewhere inbetween heavy literature and trashy novels is generally what I read. Right now I'm enjoying the Inspector Ian Rutledge series.  These are wonderfully crafted "who done it" mysteries.  I grew up reading Nancy Drew Mysteries and still remember the thrill of reading these stories late at night snuggled in my warm safe bed.  So it's not surprising that I still enjoy a good mystery.  The Inspector Ian Rutledge stores always begin with a leisurely unfolding of small details that finally add up to an exciting unveiling of the guilty party. Albeit sometimes the conclusion is a bit of a stretch.  But I can put that aside as I enjoy the process of reading the stories so much.  And I find the main character, Inspector Rutledge, very sympathetic. He's a shell shocked WWI vet who returns to England and attempts to resume his career as an Inspector at Scotland Yard while battling his own demons  He's a very real character and the stories give a personalized insight into the stress that good men and women are put under in the impossible circumstances of fighting a war.  My father fought in the Korean war in the trenches with great courage under sniper fire with his unit assigned the risky and hazardous task of advancing communication wire.  He was awarded the Bronze Medal for bravery in combat.  Remarkably he came home from the war and simply got on with college and rebuilding his life and starting a family.  And a kinder person you'll never meet.  Maybe it's that family history but for whatever reason I find war stories fascinating and this series provides an exceptional insight into the emotional price of war.


Until next time be well and love well and watch out for all things that creep, crawl and go bump in the night!

Saturday, September 24, 2016

Brooklyn Tweed Sweater, Scarf Accessory, and a Frontier Style Breakfast!

I have long admired the beautiful designs of Brooklyn Tweed which embody the rugged American frontier lifestyle. Jared Flood and the designs he curates under the Brooklyn Tweed brand are both classic and functional.  And it was time I knit a Brooklyn Tweed design.


But I had sworn off knitting sweaters because I don't wear them often enough to justify the time and expense that goes into making them.  But then I had an epiphany.  It wasn't sweaters per se that were not functional in my wardrobe but rather it was my dressy sweaters that never got worn.

So I decided to knit myself a practical sweater to wear in the fall and winter months when the mornings and evenings are cool and often downright cold.  I wanted something that I could pull on in the mornings when I like to sit outside and enjoy my morning coffee or that I could slip into for my late afternoon hike with Simcha.  Something without fuss or bother in a neutral color.

It took a lot of searching before I settled on this design.  I already knew I wanted to use Shelter a worsted weight yarn manufactured by Brooklyn Tweed, but picking the pattern was more time consuming.  I finally settled on the Little Waves Sweater which is actually a unisex sweater (although there is different waist shaping for each sex).  I liked the long sleeves, the pockets, the cool textured design, and the button up front.


The finished sweater came out exactly perfect for what I wanted.  My thoughts on the yarn, Shelter, are a little more complex.  Shelter is described on the Brooklyn Tweed website as "an artisanal woolen-spun yarn made from the fiber of Targhee-Columbia sheep grown in the American West.  This yarn has been meticulously crafted to suit the needs of the passionate handknitter."  That might be true but for someone like me who knits a lot shawls and socks with merino wool it's a rough feeling wool to work with.  For that reason I actually wasn't too happy while knitting this sweater.  But then I tried the sweater on. Gone was the pain just that.  Similar to the pain of childbirth (so I'm told) it was forgotten and all I had left in my heart was love for this yarn and sweater.


It's hard to describe the feeling I had when I tried on the sweater.  The best I can do is say it was like pulling on a hug. The loftiness of the wool creates a light fabric but it's a thick worsted wool and somehow that comes together to imbue a feeling of warmth and coziness. So the bottom line is that I will definitely  knit another sweater using Shelter and I can understand all the love there is out there for this yarn.  It is however an outer wear wool in my opinion.


Particulars:  Little Wave Sweater designed by Gudrun Johnson (author of The Shetland Trader); Design is from Wool People Vol. 6 (a collection of designs curated by Brooklyn Tweed); US 8 circular needles;  9 skeins Shelter (100% American Wool grown in Wyoming) colorway Truffle Hunt.  I knit the smallest size and my only modification was to downsize the sleeves for a more fitted look.  I used slightly more yarn that the pattern indicates so I would suggest buying an extra skein just to be safe.  For tips on how to knit a sweater with a perfect fix see my post Knitting a Sweater and Tips to Achieve a Perfect Fit.   I bought the yarn over the phone as my LYS does not carry this yarn.  I found the staff at Churchmouse Yarns and Teas very helpful in picking a color.  The buttons are handmade from walnut wood and I purchased them on Etsy from Wooden Buttons Galore.  This is a well written pattern and a perfect fitting sweater.


N.B.  I lightened the last 2 pictures so you can better see the pattern detail of the sweater.  The colorway Truffle Hunt is a lovely rich brownish grey with blue flecks.

Scarf Accessory ~

I also knit the scarf that I'm wearing in these pictures. It's knit in a fingering weight yarn with beads added.  If I'm going to add beads to a project I like them to show up otherwise it's not worth the time and bother of adding them. The bead I used are oblong shaped with a pretty rainbow yellow color and they catch the light beautifully.  The soft yellow color of this scarf makes a perfect early fall accessory.


Particulars: Shallows Scarf designed by Bonnie Sennot (author of the blog Blue Peninsula); US 4 needles; 1 skein 200 Herriot (464 yrd) hand-dyed by Skeins in the Stack (Etsy vendor) in Chamomile colorway (I purchased this kit).  I purchased the beads from Earth Treasures Gems (on Etsy) and I used 16 grams Miyuki Long Magatama beads which is more than the pattern calls for because I used more yarn and knit a longer scarf.  This was an easy and enjoyable pattern to knit.

Frontier Style Breakfast ~


In the fall it's nice to start the day with a hearty breakfast.  After all it is the most important meal of the day!  I usually have a slice of my homemade bread with oatmeal but when the days turn cooler I like a stack of pancakes.  You could go for the decadent cake like pancakes that I like to indulge in a couple of times a year (I use this recipe Old Fashioned Pancakes).  But for everyday pancakes it's more prudent to choose buckwheat pancakes and I love the mix made by Kodiak Cakes.  Kodiak Cakes's box tells the story how flapjacks (i.e. buckwheat pancakes) were the hearty mainstay of frontiersmen from the fridged Yukon to the High Sierras.  These rugged mountain-men and homesteaders apparently relied on the rich, substantial taste of these flapjacks which contained a powerful source of carbohydrates, protein and fiber, with every little fat. You simply add water to the mix and I like to top them with local honey, fruit and granola.  For the picture I used butter and maple syrup, but that's not how I typically eat them.  The griddle should be very hot and I spray it lightly with olive oil.  Perfect every time.    

As much as I have a fondness for the frontier and pioneers I'll admit that my perception of the frontier has been influenced by Disneyland's Frontierland and it's Country Bear's Jamboree (remember I was a child when I first saw this).  I still love those rocking bears.  But I understand in reality the frontiersmen and pioneers had a very difficult life. In fact, if I had been a pioneer on one of the wagon trains I'm sure I would have been buried along the trail. Probably the first week out.  And everyone would have missed my cooking.

Finally to accompany your frontier breakfast you need a delicious cup of coffee.  This morning I'm drinking Irish Cream a flavored coffee by Christopher Bean Coffee. Love the aroma and smooth taste of this coffee.

Until next time be well, love well and enjoy fall and all the wonderful colors, flavor and foods of the season and especially the hearty breakfasts!


Friday, September 16, 2016

Chocolate Chip Shortbread Cookies


I know I promised a Fall project this post but work has been hectic and one must be flexible in life. While I catch my breath I've opted for a quick post with a classic shortbread cookie recipe with a bit of a twist by adding chocolate chips.  By way of background my maternal grandmother was Scottish and my grandfather was English so it's no surprise that I was raised drinking copious amounts of tea and munching lots of cookies.  With all the sweets that I've consumed it's really astonishing that I still have my own teeth.  Which is neither here nor there.  My point is that one of my favorite childhood treats at teatime was a simple classic shortbread cookie for which I have at last found a recipe.


It hasn't been as easy as you might think to find such a recipe.  Over the years I've tried several but never achieved a nice dry short cookie similar to the shortbread I had growing up.  Until I came across a recipe in Victoria Magazine (I love all their issues) that finally had what I was searching for.  Except, being an American, I of course had to add something to take the cookies up a notch as all American cookies are loaded with ingredients.  I also eliminated some nontraditional spices they had added.  This way I was able to honor tradition and still have a cookie to satisfy my American tastes.  I hope you will enjoy these cookies which are particularly nice on a cool afternoon with a hot cup of tea.  And I'm speaking of an English style tea.  If you haven't a favorite black tea I recommend Taylors of Harrogate, Yorkshire Gold which I love with a splash of milk.  For tips on brewing an English tea (as gleaned from my mum who was born and raised in England) I refer you to a post that I think you'll enjoy Put the Kettle on It's Tea Time.  Without further ado, the recipe.


Chocolate Chip Shortbread Cookie Recipe, adapted from Scottish Shortbread Cookie recipe, Bliss Victoria Magazine (September 2013).

Ingredients:

1 cup unsalted butter, softened
1/2 cup soft light brown sugar (firmly packed)
1/2 tsp. vanilla extract
2 1/4 cups all purpose flour
1/4 tsp kosher salt
1/2 cup bittersweet premium (large) chips or chopped bar chocolate.  I use Ghirardelli chocolate.

Steps:

1.  Preheat oven to 350 degrees.  Line a baking sheet with silpat or parchment paper.

2.  Beat butter, brown sugar, and vanilla extract until light and fluffy, about 5 minutes.  Scrap bowl often.

3.  Combined the flour and salt and then add to butter mixture.  On slow speed add the flour until mix comes together as a dough.  Turn dough out onto a lightly floured board (add very little flour to your dough during the kneading) and knead for approximately 5 minutes.  Do not rush the kneading process as it's the long kneading period that gives these cookies a wonderful short texture.  After the dough has been kneaded add the chocolate chips and fold in several times to combine evenly.  Using a rolling pin (or the palm of your hands) flatted dough into a disk approximately 1/2 inch thick.  Use a 2.5" biscuit cutter to cut out cookies or simply slice into traditional rectangular shape.

4.  Bake cookies for approximately 15 to 20 minutes (depending on thickness) until slightly golden in color.

5.  Optional toppings.  While still warm sprinkle with demerara sugar or after completely cool you can drizzle with warm bittersweet chocolate.  But be warned the chocolate topping only looks best the day they are made and won't last as well, although they are deliciously decadent.

Nibble nibble.  Store in a cool dry container for a day or two or freeze.


Incidentally, the Emma Bridgewater mug pictured above was a gift from my sweet sister who brought it for me all the way from England.  I love how perfect it is for Fall and use it every morning.

Until next time be well and love well and ready or not it's time to revel in autumnal splendor.  Fall doesn't technically arrive until September 22, 2016 but I couldn't resist an early pumpkin that I delightedly dragged home.  "It looks like it has leprosy" Steve observed adding he wants his pumpkin to be a plain orange one.  To each their own I say!  What will your pumpkin look like?


Monday, August 22, 2016

A Yankee Doodle Shawl and Simcha Stories

Being a proud American I couldn't resist naming this my Yankee Doodle shawl!  For non-Americans that is a reference to a popular folk song during the American Revolution.  It's the Doodler of course designed by Stephen West.


I'm not sure if anyone else has noticed, but it seems shawls keep getting bigger and bigger and bigger. Where will it all end, I ask?  When I first began knitting shawls 10 years ago I would buy a single skein of sock yarn, knit a very lacy pattern, block the bejeebers out of it and have a shawl.   But that's old school.  

There has been a seismic change afoot in the designing world that makes it an incredibly exciting and interesting time to be a knitter.  Today's designers use little lace work and it's rare to find a new pattern release that doesn't use at least two skeins of sock yarn and can run anywhere from 800 to 1,000+ yards. This shift to more use of color and materials with less lace work makes for more modern looking shawls. A change that is being noticed even by non-knitters although they don't understand the reason why today's knitting looks different.  Suffice it to say they're nonplussed when they see a project like this.  I recently had a gentleman comment "that's not my grandmother's knitting."  I'm sure he meant it as a compliment although I had a grandmother who knit wonderful cozy slippers and I loved her knitting.  But I understood what he was saying to me.  The shawl looked nothing like what his grandmother would have knit in shape or color.


Leading this charge and redefining what modern knitting looks like is knitwear designer and Instagram phenom Stephen West who designed the Doodler shawl I am wearing and has amassed incredible portfolio of amazing modern designs.  He's not afraid of color and uses the term "shawl" loosely.  I absolutely love his work and although it's only August something to keep in mind is that he has an annual mystery KAL usually in November that you can keep tabs on in his Ravelry group West Knits Fan Club.  


You have to be careful with these multi-colored projects though.  You do after all want to have a shawl that you can wear when all is said and done.  You can pretty much count on a Doodler with a neon green wing span, a black accent color, and a sparkling rainbow trim being a hard shawl to find an outfit for.  So I don't throw in completely with Stephen West on that score who is a big fan of bright color and extreme contrasts. He can pull off that sort of color combination beautifully.  But then he has a unique sense of style. Speaking of his style you need to see his music video Baby You're a Knitter as it will give you a taste of his crazy fun personality.


Particulars: The Doodler Shawl by Stephen West; 3 skeins Hedgehog Fibers Skinny Singles (colorways Urchin, dark truffle and Monarch); US 4 needles.  My project page on Ravelry has some "tips" for conserving the main color yarn as the first color runs very tight and many people ran out during the KAL last year.  I finished with literally a yarn or less of yarn in the main color.  I made no modifications whatsoever although I did not block the shawl aggressively. You can see that I did add the embellishment on the edging and I'm very happy with that decision.  It's a small aspect of the design that adds a nice finishing touch.  Finished blocked dimensions: 47" x 18" (as opposed to the 60" x 24" of the pattern dimensions).  I chose to block to a smaller dimension as I thought I would find a smaller shawl in this pattern easier to wear.


N.B.  There are several things to be aware of when knitting a shawl like this that uses multi-colored yarn/skeins.

1.  You need to check for color fastness before beginning your shawl.  My post on knitting multi-colored shawls gives a few tips on what you should do before casting on; and

2.  You might want to consider how aggressively you block your shawl. Sometimes less is more and in this case I only lightly blocked my doodler (see my finished dimensions above).  My post on the Lunna Voe Shawl discusses creative blocking such as I used here.

Simcha Stories ~

It's been a long time since I've shared a Simcha story.  We still go for our daily hikes but he's no longer the terror he was his first few years so there's not as much fodder to talk about.  He's still an imp though and likely to be to the end of his days.  Part of his personality is a contrariness that runs deep in his spirit.  If you want something from him he will be loath to part with it.  So it happened that we found a ball on our hike and I wanted to throw it for him.  But he didn't want to give it up, even though he loves to chase a ball.  Being the firm disciplinarian that I am I decided to ignore him. I lay back on the grass with my arms outstretch above my head, closed my eyes and enjoyed the warm sun soaking into me.  After a few minutes of pure blissful relaxation I felt a gooey slimy ball being placed very gently into my outstretched hand.  It was time to play ball.


Until next time be well, love well, and have fun picking out your fall and winter projects!  PS I'm very excited about the project up next.  Hint it's the perfect Fall and Winter piece. 

Wednesday, August 3, 2016

Homemade Waffle Cones and Paper Cone Holder Template

It's late summer and hot outside.  Sounds like the perfect time to up your ice cream game!  Have you ever wondered why it is that going out for an ice cream is so much more tasty and fun? It's all about the delicious cones that they serve the ice cream in.   And now it's easy to make these waffle cones at home too.  So forget about the heat and indulge in this tried and true summer treat.


I'm not sure if left to my own devices I would ever have thought to make ice cream cones at home. But Steve my beloved partner in life has a special aptitude for dreaming up ways to take desserts to a new level of decadence.  If I'm eating a brownie he'll suggest it needs a scoop of ice cream or perhaps the cookies I've just baked should be drizzled in chocolate and sprinkled with nuts.  You get the idea. And it was his suggestion that we purchase a waffle cone maker and make ice cream cones at home. My first response was "what?  Are we twelve year olds?"  But I'm game for anything so we bought a waffle cone maker.  Now that I've made a cone or two all I can say is what. a. brilliant. idea!  Because you don't have to be a twelve year old to appreciate the joy of a fabulous ice cream cone.


It is super easy to make the cones and they are every bit as delicious (more so) than the cones that you get at the ice cream shops.  We've also stocked up on sprinkles (Cake Mate are the best), toppings, and a variety of ice cream flavors and, as Steve's cousin drolly remarked, all we lack are customers. Which reminds me that setting up a Sunday bar makes a fun company dessert, especially in the hot summer months.  Trust me everyone will love it.  So without further ado, here's a tasty recipe for Vanilla Waffles Cones: 

Vanilla Waffle Cone Recipe ~

We use WaffleCone Express by Chef's Choice (Model 838/838SE) and couldn't be happier with this product.  The link I provided is to Amazon because that's where I purchased mine not because it's the best price.  I believe this product is carried at numerous places.

Yield 7

Ingredients:

2/3 cup all purpose flour
1/4 tsp. salt
2 large organic eggs
1/2 cup sugar
1 tsp. vanilla extract
4 Tbs. (1/2 stick) unsalted butter melted and cooled (approximately 40 seconds in the microwave)
1/4 cup whole milk

Directions:

1.  Preheat waffle maker according to manufacturer's instructions.  I like to set the color control dial to 3.  Place a thick dishcloth on the counter next to the waffle maker along with the "cone form" (this is tool that you use to shape the cones).

2.  Melt the butter and set aside to cool.  Also sift together the flour and salt and set that aside too.

3.  In a medium size bowl whisk together the eggs, vanilla and sugar until the sugar dissolves.  I use an extra fine baking sugar that dissolves quickly but you should plan on vigorously whisking at least 1 minute.

4.  Add the sifted flour to the egg mixture and stir with a wooden spoon until just incorporated.  Then add the milk and melted butter and stir with a wooden spoon again just until incorporated.

5.  When the waffle iron light is green ("ready") spoon 1/4 cup batter onto the middle of the griddle and quickly close the lid.  I cook mine for 1.15 minutes (i.e. 75 seconds).  Lift the lid and using a rubber spatula transfer the cone to the dishcloth and quickly form the cone around the "cone form" provided with your waffle iron and firmly press to seal the cone seam.  The cone is very hot right off the iron and I like to use an extra dishcloth to handle the cone during this process.  Allow the cone to cool in the form while you make the next one.  Makes a total of 7 cones.

Recipe adapted from Williams-Sonoma Waffle Cone Recipe.


We haven't begun making our own ice cream.  Yet.  The ice cream shown in the pictures is mint chocolate chip from Baskin Robbins a flavor that I've loved since I first tasted it as a kid.  If you are feeling adventuresome and want to try making your own ice cream I recommend that you visit Patty Mac Knits for her Butterbeer Ice Cream Recipe and while you are there take a peak at her fun and quick Harry Potter pattern collection.  After all fall is the perfect time to wear school colors whether you are cheering a favorite football team or Hogwart's House!

Paper Cone Holder Template


I decided to include a cone holder tutorial because after eating one or two cones we discovered that the bottoms of the cones can leak and that infringes on the enjoyment of the experience.  I was going to buy some online until I looked at the prices and saw what you got for what you paid and I thought there has to be an easier and more economical solution.  And there is.  All you need are a few simple supplies.

Supply List:

An assortment of colorful scrapbooking paper (I buy mine at Michael's Craft Stores).
Razor knife or pair of scissors
Tape - clear gloss looks best
Paper Cone Holder Template (free download)

Tutorial:

Trace the Paper Cone Holder Template onto your scrapbooking paper using either a a razor knife or ink pen and cut along the edges.  Shape into a cone and tape the side seam.  I like to add extra tape around the bottom to ensure a no drip cone holder.

It is that simple!  These are fun to make and work beautifully at holding your cone.

Until next time be well, love well, and don't fight the heat this summer, instead embrace it as the perfect ice cream weather ~