Saturday, December 29, 2018

It's a Wrap - My Texture Time Shawl

It's been some time since I've felt like visiting this space.  Over the past six months I lost my father to Lou Gehrig's disease and my dear mother is currently in skilled nursing with a fractured pelvis.To be honest I debated abandoning my blog during this period as it seemed so trivial in comparison to what my family was going through. But I realized going through this sad process how important memories and pictures are as you get older.  I think one day I'll look back at my blog and the pictures and stories will make me smile as I remember all the things that I've made during my life.  And hopefully my knitting tips and recipes will have made other people's lives a little more enjoyable along the way too.


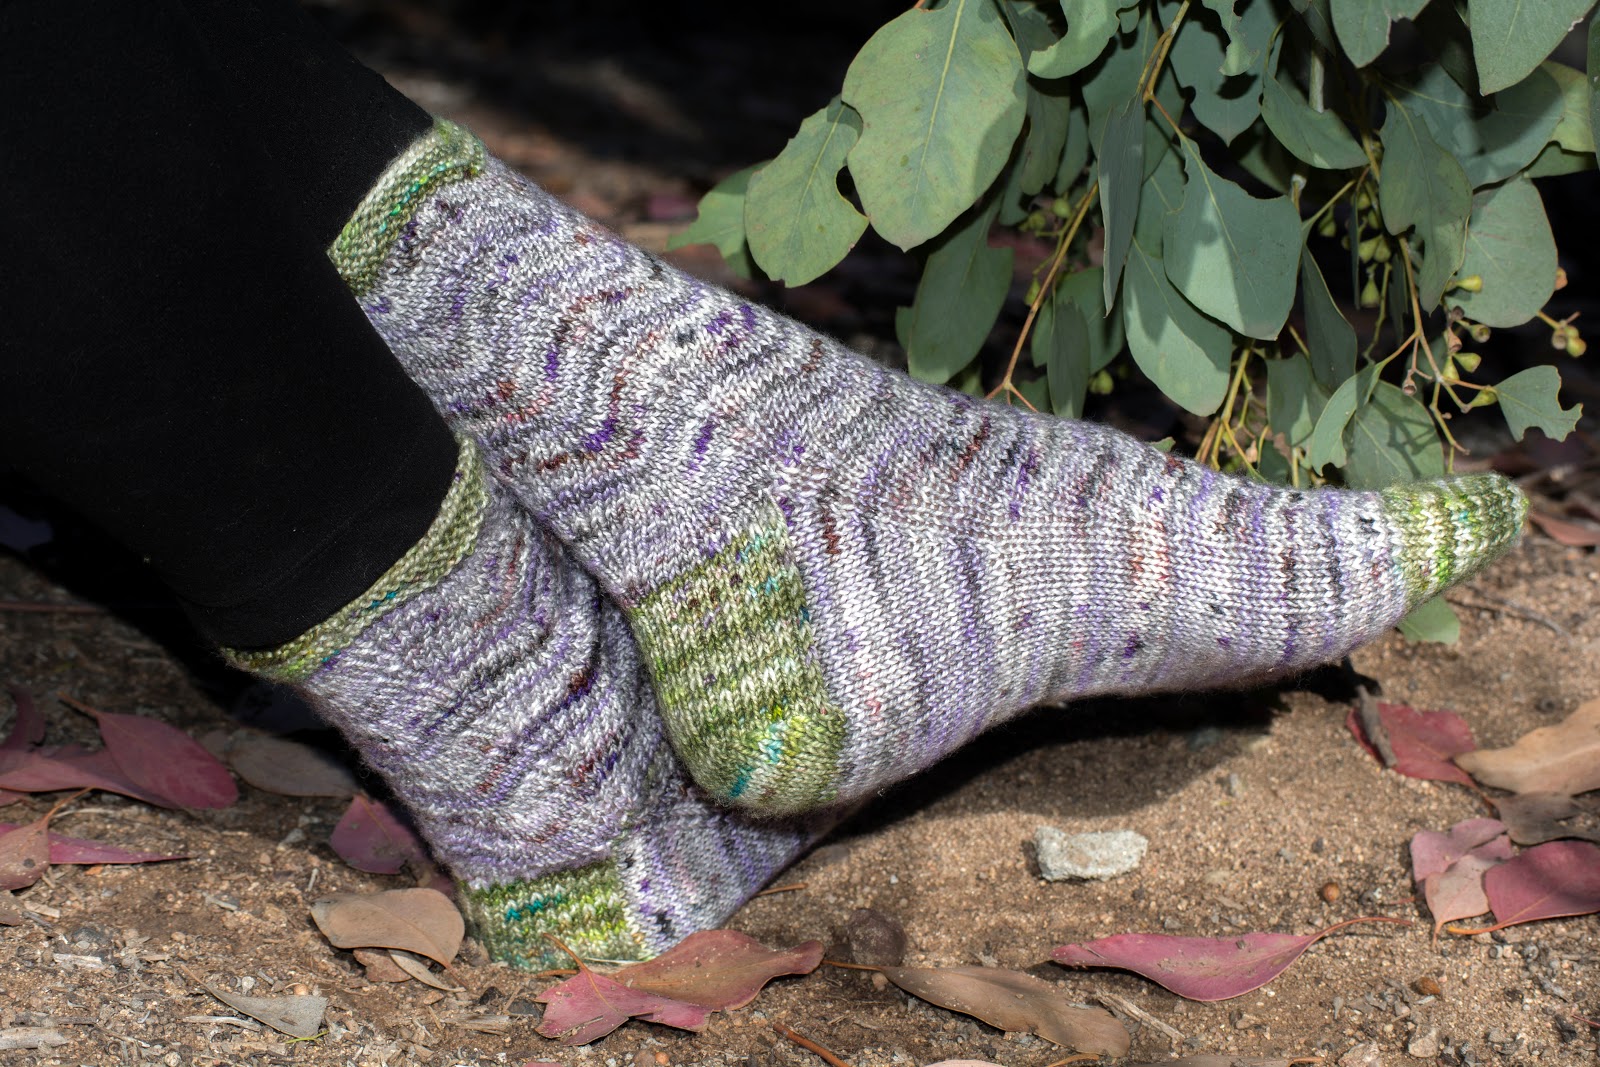
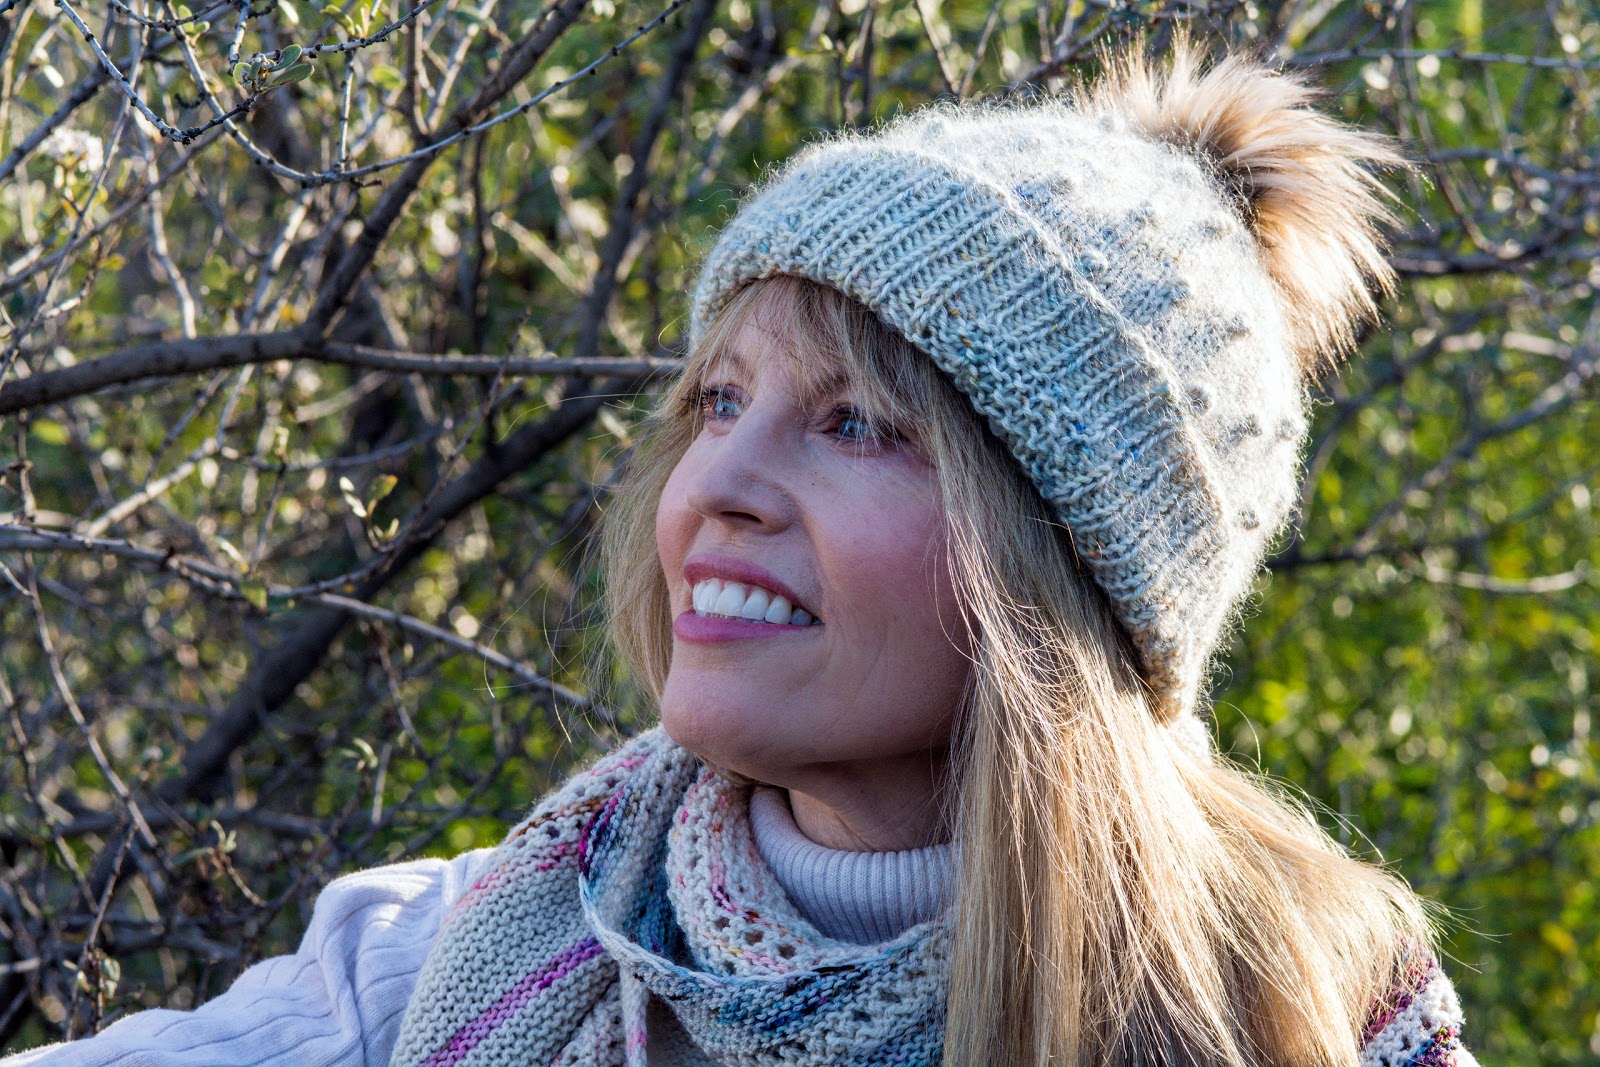
I have been busy knitting away this entire time and have finished many beautiful pieces that may never get their moment to shine.  But I wanted to return with a truly special piece of knitting and so I chose my Texture Time shawl which is Stephen West's 2018 mystery knit along (MKAL).  This piece is a knock out and attention grabber, especially when you turn around and people see it from the sides and back.


I loved knitting this project.  Like all Stephen West's designs it is well written and full of creativity.  Some might even say it's flamboyant.  And I say why not go for it.  That is why we knit after all, isn't it?  We want something that is uniquely ours and expresses our creativity.  Otherwise it would be cheaper and easier to simply buy something that is mass produced.  Speaking of which I should point out that I did make a few modifications to this design (detailed below). Whether it is color, fit, or a design element almost every knitting pattern can be improved with simple modifications and you are missing a wonderful part of the knitting experience if you fail to do so.  Before you begin any project and as you progress on a project you should always be asking yourself if there isn't a better option for the color, fit, or design that would better suit you and your tastes.  Admittedly it's harder to do this as a new knitter but with time and experience that thought process should be part of how you think about every project that you knit.

As for the actual knitting of this design I think the one major challenge is the back panel which is "syncopated" brioche.  If you are new to brioche knitting this, in my opinion, is not the starter project for you.  But if you are game or simply need a refresher course on brioche I highly recommend Craftsy's online brioche class to get you started.  If you do knit this shawl I guarantee that you'll have a one of a kind piece of knitted art.


Particulars:  Texture Time MKAL (2018); designed by Stephen West; US 5 needles; Spun Right Round (classic sock and mohair (held double)).  My only modifications were (a) I did not follow his suggested order of colors for the back center panel (i.e. light to dark) and instead I went in the order of colors that created contrast best (b) I substituted and/or added a bright acid green yarn (from stash) for the wavy contrast portion to help make that design element really pop (c) I added a single strand of mohair to the sides on pattern rows to create a striping effect (d) I substituted my main color for the tips rather than using the green contrasting color as suggested; and (e) I did not knit the tips as long as suggested as I felt that adding too much length to the sides would overwhelm the shawl.  I am very happy with my final shawl and can't wait for next year's MKAL adventure!  Previous MKALs by Stephen West that I've participated in include The Doodler shawl and Marled Magic Shanklet (post also includes my Striped Esjan shawl which is Stephen West design, but not a MKAL project).  If you are looking for a basic brioche project I recommend the Parlour Shawl, which was my first brioche project.

In Loving  Memory of my father, Vernon Bugh, Jr. ~


As I mentioned above my father recently passed away.  I don't want to dwell on the sadness of the disease that took him from us.  Instead I want to remember all the happy times we had as a family.   I specially love this picture of him that I took a few years back because he particularly loved Christmas.  He always went to great lengths to decorate the outside of our house and property with beautiful bold strands of Christmas lights.  It was important to him that he select the perfect Christmas tree for my Mom to decorate inside and he would drill holes in the base and nurture the tree with solutions to keep it fresh through New Years.  He also had fun with the holiday.  He was always the first to suggest it was time for eggnog spiked with whisky or rum.  He collected and set up a whole holiday village display in the living room complete with houses and shops that lit up and cars and carolers strolling the streets.  When I was little he had a neighbor dress up as Santa Claus and come to our house.  Santa gave my sister and me a candy cane and told us to watch for his sleigh leaving from our back window.  I still remember wearing my pajamas and bright blue fuzzy slippers standing in the living room watching for his sleigh out the back window and being puzzled how I could have missed it.  And every Christmas morning he captured all the chaos and fun of opening presents using an old fashion movie camera.  He was sentimental that way.  I hope to come across these old films when my sister and I go through the house.  I won't be able to watch them right away but hope that someday I can watch them and smile.

After my dad passed many of our neighbors wrote or told me what a wonderful neighbor he was and how much they will miss him and miss seeing his house beautifully lit for the holidays.  It was a hard Christmas this year as it was my first year without him.  And Christmases and my life won't ever be the same.  But I do have all my memories of him and I know that we will be together again in heaven as he is now with his mother, brother Cecil and sister Shirley and all his dearly loved friends and family that departed before him. 

My dad lived a remarkable life and only snippets have been included on the blog.  But there are a few posts that talk about my Dad include a post that shares his fabulous BBQ chicken rub recipe; his favorite Christmas cookie recipe; (which also includes a bit of his life history including his award of the Bronze Star for bravery in combat); his stint as a lumberjack; and his firm belief in the health benefits of drinking a daily glass of orange juice!  He also made a few cameo appearances on the blog helping me showcase some of my knits along the way, proving he was a good sport to the end.

Vernon Bugh, Jr.  ~ May 22, 1929 - November 30, 2018 ~

Until next time be well, love well and I hope that 2019 will be a happy and healthy year for all.

Friday, July 6, 2018

Ripple Wave Socks, Binge Worthy TV and Nectarine Breakfast Bread

Aren't these fun socks! They are my Ripple Wave Socks and I feel like dancing a jig in these sprightly colors.  Just like the wonderful Irish folk song Uncle Benny "they've set my toes a tapping" hum hum hum.  Of late I've spent too much time in silence or listening to gloomy news reports with not enough time filling my home with music.  Listening to beautiful music makes my heart soar, feet tap and just makes me happy.  Growing up I listened to a lot of music.  On Saturday mornings my mother would often cook a full English breakfast (replete with fried egg, bacon, fried tomatoes, toast, marmalade and, of course, a pot of tea) and beautiful music would be playing in the background and our weekends began in this leisurely fashion.  When I got to choose the music I liked to listen to Irish folk music and I particularly liked Roger Whittaker who sings Uncle Benny on Danny Boy and other Classics.  To this day I enjoy hearing him sing these songs.


But enough about music and more about socks!  If you haven't yet been bitten by the sock bug the heat of summer is a perfect time to get hooked!  You'll love the endless choices of gorgeous sock yarns, how quickly a pair of socks knit up, and most importantly come fall you'll realize how wonderful it is to wear your own hand knit socks. You'll also be very popular with friends and family who vie for a pair of your socks!  If you are intimidated to get started, don't be.  You can find many free youtube videos to help you or you can sign up for a paid Crafty Class (I've been a fan of Crafty ever since they taught me the Brioche stitch and I breezed through my first Brioche Project).   And the choice of sock patterns is endless.  There are thousands of free sock patterns on Ravelry, including my Color Block Socks.  Who knows maybe you too have a sock pattern lurking within you.  In any event I encourage you this summer you give sock knitting a try or if you are already a sock knitter to store up a supply for next winter.


Particulars:  Ripple Wave Socks; designed by Kate Lore Designs; US 1 needles; Ritual Dyes sock yarn, i.e. Maiden (100gr, 400 yds of 80% superwash merino and 20% nylon. 2-ply twist) this is yarn leftover from my Sunset Highway Sweater (the blue/purple is the upper yoke colorway and the green is my contrasting color).  This is a wonderful pattern and a pleasure to knit.  I should also mention that all proceeds from the pattern are donated to Doctors without Borders which is no surprise to anyone who knows Kate Lore, a long time blogger and all round class act.  To link to more examples of socks that I've knit (I've knit many) would be too cumbersome so instead I'll link to a pair that has a particularly nice and intricate design that is perfect for slow indoor summer knitting ~ 50 Shades of Green. ~


BINGE WORTHY TV ~

Summer.  Yuck.  My least favorite season.  I'm clearly not a sun worshiper so when it's sweltering outside I like to be inside binging on TV shows.  And as I love hearing other people's favorite shows I thought I would share my list of binge worthy TV.  I didn't include the obvious (i.e. Game of Thrones and Outlander) and if I've missed a show that you love I want to hear your recommendations in the comments!  FYI we are "on-demand" TV watchers and obtain all of our programming through Amazon Prime's Fire Stick (best investment ever).  Many of these shows are free to Amazon Prime Members or are purchased through channels available on Amazon.  But as not everyone is an Amazon user the links below are to IMDb ("Internet Movie Database") where you can see reviews and read more about the shows and stars.  Be warned this is a very diverse list and there are shows on it that will not be everyone's cup of tea due to violence.

Bates Motel    Learn how Norman Bates became "Norman Bates."
Lost in Space (2018)  A fun and well done redo of this classic.
Berlin Station   Modern spy story of the CIA in Berlin
Peaky Blinders  Fascinating (but violent) story of gangs in England post WWI
Frankenstein Chronicles  Clever story of how Mary Shelley's Frankenstein came to exist
Counterpart  Modern sci-fi
Riverdale  See Archies Comics come to life in the small town of Riverdale
Ripper Street  Well done crime story set in the era of Jack the Ripper (stars Matthew Macfadyen)
Altered Carbon  Modern sci-fi
Goliath - Los Angeles lawyer fighting corruption (set in Santa Monica, California)
The Royals  See the British monarchy as you've never seen them before
Imposters  Fun romp with engaging actors
Westworld  Modern sci-fi
Animal Kingdom  Story of a small time crime family in California (stars Ellen Barkin)
Banshee  Violent but interesting story set in a midwest town
Ozark  "Normal" family moves to the Ozarks on the run from gangsters and the law
Billions  Wall Street schenigans
The Americans  Spy story set in the 70's
Da Vinci's Demons  See how fictional Leonardo Da Vinci's life evolved
Electric Dreams  Sci-fi (an updated Twilight Zone)
The Staircase  A fascinating story for true crime buffs
The Night Manager  Adaptation of a Le Carre Novel
Suburra  Crime and family drama set in Italy


NECTARINE BREAKFAST BREAD ~


This is a wonderful breakfast bread that is a new summer treat for me.  The sweetness of fresh nectarines are perfectly balanced with cornmeal, lemon, and thyme and it's quick to throw together so long as you have ripe nectarines on hand.  It's also a fun change from muffins in the morning.  I used a recipe from the latest Southern Cast Iron magazine which never fails to deliver recipes that I love.  I hope you enjoy it as much as I do.

Nectarine Breakfast Bread ~

Bread ingredients:
1 1/2 cups all purpose flour
3/4 cup granular sugar
2 Tablespoons stone ground cornmeal
1 1/2 teaspoons baking powder
1/4 teaspoon finely ground salt
1/8 teaspoon ground cinnamon
2 large organic eggs
1/4 cup whole milk
1/4 cup unsalted butter, melted (I use Kerry Gold butter for all my baking)
1 tsp. vanilla extract
1 lemon - zest used as follows: 3/4 zest for loaf and 1/4 zest for Lemon Thyme Syrup (see below)
1 cup chopped pitted nectarines
1 whole nectarine sliced into decorative wedges (for layering on top)

Lemon Thyme Syrup ingredients:
1/4 cup water
1/4 cup granular sugar
2 large sprigs fresh thyme
1/4 of lemon zest from a whole lemon


Steps:

1.  Preheat oven to 325 degrees F.  Prepare a bread pan by rubbing with butter and coating lightly with flour.

2.  In a large bowl whisk together dry ingredients (flour, sugar, cornmeal, baking powder, salt, and cinnamon).  Set aside.

3.  In a medium bowl whisk together wet ingredients (eggs, milk, melted butter (add last), vanilla, and 3/4s zest from a whole lemon).

4.  Using a Swedish dough hook or wooden spoon quickly incorporate wet ingredients into dry.  Gently fold in chopped nectarines.  Pour batter into loaf pan and smooth top.  Place decorative nectarine wedges across the top, leaving 1 inch space between each slice.

6.  Bake 55 minutes and check if loaf is a nice golden brown and a tester comes away clean.  If the loaf needs additional time continue baking but cover loosely with foil to prevent over browning until tester comes away clean.  Baking time will vary depending on ingredients, humidity, etc.  I baked my loaf a total of 65 minutes with it covered in foil for the last 10 minutes.

7.  Allow loaf to cool in pan for 20 minutes.  Then turn out onto a cooling wire to cool completely.  While loaf is cooling prepare lemon thyme syrup.

8.  Prepare lemon thyme syrup by combining water and sugar in a small saucepan and bringing to a boil, stirring until sugar dissolves.  Remove from heat and add fresh thyme and lemon zest and let cool before using.  Slowly drizzle cooled syrup over cooled loaf allowing it to cover all surfaces but mainly focusing on the top.

This loaf freezes well, although like all baking it's best the day it is baked.

Recipe slightly adapted from Southern Cast Iron Magazine July/August 2018 issue.

I'm also a fan of muffins in the morning and my favorite morning muffin recipes are: Orange Muffins, Raisin Bran Muffins, and Espresso Banana Muffins.


Until next time be well, love well and this summer try beginning  your weekends with a cooked breakfast and listening to beautiful music while knitting away on a pair of socks!

Tuesday, May 22, 2018

Land of Sweets Cowl and Yarn Advent Calendars ~


Whether it's May gray or June gloom Springtime in California is often foggy and downright cold. And yet I don't want to be pulling on winter woollies any longer as emotionally I've moved on to the next season.  Which is why I always knit a few Spring and Summer friendly accessories in lightweight fingering yarn or cotton.  This year I modified Curious Handmade's Land of Sweets cowl to make myself the perfect Spring accessory as it reminds me of a bouquet of spring flowers.


I absolutely love the colors in this cowl.  And I can take absolutely no credit whatsoever in picking them. Because the yarn I used came in a Yarn Advent Calendar dyed by Kelly of Lay Family Yarn who is a genius with pastels.  For those who may not be familiar with yarn advent calendars, it works like this.  You sign up for a yarn advent calendar well in advance of an upcoming holiday (typically Christmas or Easter) and when it gets closer to the holiday you will receive a bundle of individually wrapped mini skeins with a number written on the outside.  Once the advent begins you have the fun of opening a daily surprise of yarn and sometimes a chocolate or other treat as you anticipate the approaching holiday.


This was my first yarn advent calendar and it was an Easter Advent that came with 12 mini skeins and some yummy mini chocolates Easter eggs too!  Upon it's arrival I immediately popped the packages into an Easter Basket and I can't tell you how much fun I had anticipating opening the packages.  I will confess to opening the first package a day or two early but thereafter I used extraordinary restraint by opening them on each appointed day.  And it's much more fun to do it that way.  If you can manage to control yourself.  This cowl incidentally was knit with the skeins in the order that they were opened with a few minor adjustments toward the end.  I did wait until all my skeins were opened to see how they looked together before diving in and beginning my cowl, even though I knew early on what I would be making.


As you can probably tell, I am now a huge fan of yarn advent calendars and I've already signed up for Lay Family Yarn's Christmas advent (inspired by an English Christmas Hamper) which will come with 24 mini 10g skeins, a full sized 100g skein, a personalized biscuit, a tea pouch, Christmas progress keeper, and other treats.  To say that I'm excited about this would be a gross understatement.  It's the closest thing I've had as an adult to a Christmas stocking, only it's enjoyed over the entire month culminating with a full sized skein on Christmas day.  But I do want to make a cautionary statement here as yarn advent calendars are not cheap.  You don't want to sign up for one unless you both a) enjoy surprises and b) really love and are familiar with the yarn dyer.  For example Kelly at Lay Family Yarn has exactly my taste and her soft pastel colors are perfect for my coloring.  I personally would not risk buying one from a dyer that I wasn't very very familiar with.  But if you think this is something you might want to try this Christmas I suggest that you begin looking now as many of the yarn advent calendars are sold well in advance to allow the seller the necessary time to plan, prepare, and deliver in advance of the holiday.


Particulars:  Land of Sweets Cowl designed by Helen Stewart (Curious Handmade); US 4 needles 12 10g mini skeins from Lay Family Yarn; US 4 needles.  I modified the pattern to create a smaller (i.e. shorter) cowl by knitting 10 rows of ribbing and 12 rows for each color stripe thereafter.  I did have enough yarn to have knit a few more rows of each color if I had wanted which would have made the cowl even longer.  I'm considering making another with my Christmas advent yarn and for that one I'll probably make it longer and strand it with kidsilk haze to make it more cozy.  Post blocking dimensions: 11" x 15.5."  To see another project where I used Lay Family Yarns see my Kobuk Hat, which might just be my favorite hat ever.  To see additional projects designed by Curious Handmade see Botan Shawlette, Vintage Fairy Lights socks, and the Winter Rose socks below.


A Pot of Tea ~


Over the years I've noticed that teacups have largely gone out of style.  I will admit that I myself more often than not drink tea from a mug.  And yet.  There is something special that happens when you drink tea from a proper teacup.  It just feels special and makes the experience of having a cup of afternoon tea more the delightful interlude that it should be.  As work has been particularly demanding lately I am trying to consciously take time to enjoy small pleasures such as a special cup of tea.  And while on the topic of tea I have recently discovered (via Little Skein in the Big Wool and her curated boxes) Adagio teas.  Anne included Adagio's Berry Creme Compote in our last box and I was so pleased with it that I ordered a refill and several other blends as well.  My favorites are Berry Creme Compote, Tumeric BlissFoxtrot, and Wild Strawberry (best cold).  These little surprise subscription boxes that Little Skein puts together are filled with special finds and I'm glad that I signed up.

Incidentally the teacake pictured above is a lemon, fennel and anise cake that I adapted from the orange anise bunt cake recipe in Milkstreet magazine.


Winter Rose Socks


Last but not least I wanted to share my Winter Rose Socks which is the first pattern from Curious Handmade's The Handmade Sock Society patterns.  I gave this first pair to my mom for Mother's day and I knit them in a soft yarn (merino, nylon and cashmere) as she likes to wear them for her afternoon naps.  I obviously am a fan of Curious Handmade (she designed the cowl in this post in case you missed that) but I will say that I generally find that I have to make a modification or two to get the pattern to work exactly right for me.  With these socks I found the instructions after the heel turn confusing so I simply followed my basic sock formula (see my free Colorblock Socks pattern) for picking up stitches and shaping for the foot and toe while maintaining the winter rose patterning on the top needles.

Until next time be well and love well and take the time to enjoy simple pleasures whether it is a special cup of tea or knitting socks for someone you love.

Tuesday, April 17, 2018

Knitspot 2018 Pairing Club and Bake Sale Cookies


I really love this cowl and Simcha does too!  It's the first of four projects in Anne Hanson's (Knitspot) 2018 Pairings Club. This club pairs food with knitting so how could I resist?  And I have always loved Anne's designs so it was an easy decision to join.  This first installment was inspired by Anne's love of sweet corn and her childhood memories of growing up on a working 10-acre farm upstate New York.  The Entrope yarn (spun to resemble handspun) beautifully captures the colors and texture of fresh sweet corn and was the perfect choice for this project.


The recipe that came paired with this project was a delicious corn chowder dish that was contributed by former chef, Katharine, who knows corn well as one should living in Ohio or really any part of rural America.  I'm looking forward to corn being back in season so that I can experience it at it's best.  I really didn't expect a vegetable to be the inspiration for this round but I'm glad that sweet corn was the featured food ingredient.  It brought back sweet memories of the summer that my family drove across country from California to Minnesota and we passed acre after acre of farmland.  The small family farms were the best.  They often had signs out front selling their produce to passers by and you could get out and wander through the fields.  Some of the best sweet corn that I've ever eaten was from those roadside farms.  When I look at this cowl I'll always think of corn and remember that wonderful summer vacation.


Although it's late Spring and starting to warm up I've had a few chances to wear this cowl on our morning hikes (I'm hard hearted and I've not given this cowl to Simcha). It's a bright and fun addition to my wardrobe. Worn with a long sleeve blouse and a vest it provides just enough warmth to my neck and chest to protect me from our chilly winds.  It's a DK weight yarn and the colorwork adds some heft too so it definitely keeps you warm, as you would expect from a rustic woolly accessory.  The gradient yarn has three main colors (light yellow, bright green, and a marled yellow and grey.  While some might not have been pleased that the marled color did not contrast well with the grey design I think that just added to the unique beauty of this piece.  I don't want something that looks "off the rack" that's why I knit.  It really is striking in person and I couldn't be happier with it.  I also have enough of both yarns left to make myself matching mitts which I will get around to at some point.  There was a coordinating hat design included but I thought this cowl with a matchy-matchy hat was not a look that would suit me.  If you look at Simcha and visualize him wearing a matching hat I think you'll see what I mean.


Particulars: Hectare Cowl, Anne Hanson's Pairings Club 2018 (Knitspot); US 5 & 7 needles; DK weight yarn, Feederbrook Farm (100% bluefaced Leicester wool; 260 yrds./100gms) and 1 skein Bare Naked Wools Kent DK colorway Tide Pool (60% merino wool/40% romney wool; 300 yrds/116 gms).  This is a fun and easy pattern to knit and I made no modifications whatsoever, except for the cast on.  For my cast on I used the Twisted German Cast On which is my favorite for stretchy edges.  My finished lightly blocked dimensions: 10" x 28."

Previous Anne Hanson patterns I've knit include Greenshadows Lace Scarf (blogged) and Pine and Ivy Lacy Shawl (Ravelry only).  For additional colorwork projects (include my tips) see Sunset Highway (sweater), Stranded in Toronto (hat), Osebury Rock (scarf) and Hebe (hat).


Bake Sale Cookies


After a long winter of baking breads and seasonal treats to share with friends and family I'm ready for Spring.  Spring is a time when I bake for myself and there's nothing I enjoy as much as a good crisp chocolate chip cookie.  I have a variety of recipes that I like but this is a favorite and I've made it many times over the years (case in point you can probably tell the pictures are from different batches!).  I hope you will enjoy these cookie as much as I do.

These are called Bake Sale Cookies because they make a large quantity and everyone loves them so it's a good and reliable recipe to turn to when you need to bake and share cookies.

Yield ~ 4 dozen good sized cookies ~

Ingredients:

2 1/4 cups all-purpose flour
1 tsp. baking soda
1 tsp salt
1 cup unsalted butter, room temperature
3/4 cup granulated (white) sugar
3/4 cup (packed) light brown sugar
1 tsp vanilla extract
2 large eggs, room temperature
2 cups (12 oz package) semi-sweet chocolate chips
1 cup chopped walnuts
1/2 cup dark or golden raisins
1/2 cup shredded (sweetened) coconut

Steps:

1.  Preheat oven to 375 degrees F. and cover baking sheet with parchment paper to prevent sticking.
2.  In a small bowl combine the flour, baking soda, and salt.  Set aside.
3.  In mixing bowl, cream butter, sugars, vanilla.  Add eggs one at a time and mix just until incorporated.
4.  Remove bowl from mixer.  Using a wooden spoon stir in flour mixture.  Add chocolate chips, walnuts, raisins, and coconut and stir until incorporated.
5.  Drop dough onto baking sheet by rounded tablespoonsful.  Baking 9-11 minutes or until golden brown.  Let cookies rest for 2 minutes before removing with spatula to wire racks to cool completely.

Adapted from cookie recipe in Parade magazine May 11, 2003.


Until next time be well and love well and be sure to sweeten your Spring with a gradient cowl and cookies! 

Thursday, March 22, 2018

Sunset Highway Sweater and Baking Sweet Breads


This is my Sunset Highway Sweater.  It's a soft watercolor interpretation of the original design which in contrast has striking details and a palpable Viking Goddess vibe.  Not that I wouldn't have liked to have been a viking goddess or indeed that it wasn't my intention to have a viking goddess sweater.  But sometimes fates conspire and what comes to pass is not what you intend at all.  And yet.  This softer watercolor version of the Sunset Highway Sweater is more reflective of my personality and one that I'll actually wear more frequently.  I also haven't ruled out revisiting this pattern someday and knitting one more true to the design.  Then again I probably won't because there are so many beautiful sweater patterns that I want to knit and I rarely knit the same pattern twice.


I knew from the start this sweater probably would not come out the way I had expected.  As soon as the yarn arrived (it was sold as a kit) I could see that it was beautifully dyed but I had a suspicion that it wouldn't have the distinct color definition needed to make the yoke design pop.  And once I began knitting I knew that I wasn't going to get a distinct pattern definition using these colors.  So I considered frogging what I had knit and substituting in solid colors. And yet.  When Steve looked at what I had knit he was in love with the beautiful colors and how they intermingled.  And so I decided to throw the dice and let the colors unfold as they may.  And I'm really happy that I did because this is a very unique and beautiful sweater.  I suspect that those who are unfamiliar with the Sunset Highway Sweater design will love this sweater and those who are a fan of the design will not even recognize it as a Sunset Highway Sweater!  Who do you think I am most likely to encounter in the real world?


You can probably tell that while I love the sweater I am a bit ambivalent about it; because it didn't come out as I had hoped and planned. Which could be a metaphor for life. Sometimes our plans don't work out but over time we look back and realize it was actually better the way that it did.  I'm not at that stage yet.

This is obviously a stranded colorwork design and there is a lot of tacking down yarn floats.  I have seen some very complicated methods to do this on Youtube videos that left me discouraged.  But there is no need for this to be super complicated so I'm going to share with you a very simple method for tacking down yarn floats.  This method works works even if you carry both strands of yarn in your right hand, as I do.  I always carry the background color over my index finger and the pattern color over my third finger.  When I want to tack down the background color I use my left hand to lift the background yarn up and over the working needle; I then knit the stitch using the pattern color; and then lift the background color off the needle and drop the strand which I then pick up again with my right hand.  That probably sounds terribly confusing but it's not really.  Play around with it and I think you'll find this is a very easy method for tacking down floats.  I'm sorry I don't know what this method is called.  I'll call it ~ the lefty lifting method ~

If you are thinking about knitting a colorwork design there are now many beautiful and unique colorwork sweater patterns out there (particularly if you are willing to knit with a heavier than fingering weight yarn).  I am currently mulling over the following choices (these are all fingering weight) Threipmuir; Arrows Down; Alyeska; and Silver Frost.


Particulars:  Sunset Highway Sweater, designed by Caitlin Hunter (Boyland Knitworks); US 2 (ribbing) and 4 (body) needles; 5 skeins Ritual Dyes, Maiden (fingering 2 ply twist) 80/20 SW Merino/Nylon, 400 yrds/100 grams (colorways: Iron (main body color), Lady Lucky, Pyrite, and malachite;  I adore this dyer's work and the yarn base is a dream to work with and I have since ordered more of her yarn for other projects.  As far as the pattern itself I knit the extra small size and my only modifications were that I knit the yoke a little longer than the pattern called for (about an extra inch and a half) and I skipped the short rows at the bottom.  But I have a small build and I've heard some say the extra small runs tight on them so you probably need to check your gauge and pick your size carefully.

Incidentally my Kobuk hat in the previous post is also by this designer ~ when you're hot you're hot ~

The last couple of years I've knit primarily cardigans but these days I'm more in the mood to knit pullovers.  If you would like to see a other pullover sweaters here are a few that I've previously blogged: Not a Jersey Girl; CalmEmily; Sideways Knitted Top; and Lily.  With my climate I don't have a lot of sweater wearing weather but there are days when they come in handy!

Baking Sweet Breads ~

Work has been demanding lately and I'm fighting a cold.  But I always make it a priority to have homemade baked goods in the house.  It's a quality of life issue and simple pleasure that I try hard not to forego. And I think during stressful periods all the more important.  I like variety so I'm always playing with new recipes.  Recently I discovered the very delicious Babka bread!  This is a versatile sweet bread (similar to a brioche loaf) that you can use with a million different fillings.  For your babka dough I recommend trying the one I use from Bake From Scratch Magazine they share the dough recipe online (albeit with a Pistachio filling).  I use Kerry Gold butter and only 9 gms of salt (1/2 tbs. versus 1 tbs) but other than that I follow this basis dough recipe (sans orange zest).  As I mentioned the choice of fillings are endless.  The loaf pictured below I made with a strawberry and coconut filling (found in Bake From Scratch's March/April issue)but a classic filling would be a chocolate filling.  I hope you have fun finding wonderful fillings for this delicious bread treat!


Until next time be well and love well.  Enjoy Spring and don't forget this is a great time to start planning sweaters to knit over the summer so you are ready for next Fall!

Sunday, February 18, 2018

Hat Topper Fun and Lucille's Red Cake Recipe ~


I've knit a lot of hats over the years but my new Kobuk hat has to be a favorite.  It might be the gorgeous yarn which has both silk and mohair making it warm and luxurious, or maybe it's the perfect wintery color, or perhaps it's the fun hat topper, or maybe it's a combination of all three!  It also has a really cool brim design that appears to resemble a crown that shows when the brim is turned down and worn slouchy style.  Which unfortunately you don't see too well in my pictures for the simple reason that the hat was easier to photograph with the brim turned up!  That being said the slouchy look with the brim showing is a cool look and I'll probably knock around wearing it that way too. No matter how you style it this is a great hat to have in your wardrobe.


I hope you noticed the cute hat topper!  This is my first time buying a hat topper instead of simply making a pom pom using leftover yarn.  Hat toppers are super on trend right now and I was curious whether I would like it better - and I do!!!  I think the hat topper gives the hat a more modern and finished look and I'm going to pick up another couple of colors and styles to have a selection to switch up depending on the accent color I want.  How will I do that?  I read on a Rav forum that some hat toppers come with a snap closure which makes it easy to change them.  But not all hat topper come with a snap closure and mine didn't.  Instead I read where someone suggested sewing a button to the inside of the hat to which a hat topper can be tied on and off.  And that's what I've done.  To do this I recommend you select a medium sized button that is plastic and light weight so it is large enough to wrap the topper ties around while being washable and not so heavy that it will drag the hat down.  This makes it easy peasy to have a wardrobe of hat toppers to switch around!


Particulars: Kobuk hat designed by Caitlin Hunter (Boyland Knitworks); knit using the Top Hat Set dyed by Lay Family Yarn (kingfisher colorway) yarn set includes 2 coordinating yarns (1 skein DK 55% Blue Face Leicester 45% silk (100g) and 1 skein 72% fine kid mohair and 28% silk).  I used a Faux Fur pom pom in colorway creme brulee sold by The Burlap Kitchen.  This a super easy and fun hat to knit.  I used the Twisted German Cast-On for a stretching brim and I only knit through the upper (bobble) chart one and a half times to create a less slouch as I have a small noggin.  Caitlin Hunter is a terrific designer and I have recently finished one of her sweaters that I can't wait to show you!

Incidentally the shawl/scarf that I'm wearing in these pictures is Enfilade by Lisa Hannes that I blogged as Multi Colored Shawls and Testing Yarn for Color Fastness.


Lucille's Red Cake Recipe ~
Steve's birthday comes early February and every year I bake him a birthday cake of his choice.  He's chosen a variety over the years but he most often he requests his mother's Red Cake Recipe that she would bake for him when he was a boy.  Lucille, his mother, graciously shared her recipe with me so that I could bake him the exact cake she made.  It's not a typical red velvet cake as Steve doesn't like chocolate so there's less cocoa and it also doesn't seem as heavy and rich as some red cakes I've eaten.  But it is light, colorful and perfect with a scoop of vanilla ice cream.  In other words it's a quintessential old fashioned birthday cake.  I'll conclude with what she wrote on the bottom of her recipe card "Good Luck!"


Lucille’s Red Cake Recipe

Yield ~ 9" double layer cake

My only adaptation of Lucille's recipe, if you will, is to add violet icing color.  Sans icing color the frosting is antique white.  

Ingredients

For the Cake

1/2 cup (1 stick) of unsalted butter, softened
1 & 1/2 cups granulated sugar, (I use superfine baking sugar)
2 large eggs, room temperature
2 tsp cocoa powder (use natural cocoa and not dutch process)
1 ounce red food coloring 
2 & 1/2 cups of cake flour (sifted before measuring)
1 tsp salt
1 tsp of baking soda
1 tsp white vinegar
1 cup buttermilk, room temperature
1 tsp pure vanilla extract

For the Frosting

3 Tbs all purpose flour
1 cup whole milk
1 cup (2 sticks) unsalted butter, softened to room temperature
           7/8 cup of granulated sugar
1 Tbs pure vanilla extract
Icing color (optional - cake is an antique white otherwise) I use Violet Icing Color by Wilton

Instructions

Cake:

Preheat oven to 350 degrees F. Prepare two 9-inch cake pans –either line bottom with parchment paper and butter sides or butter and flour entire pan. 

In a large bowl, cream together butter and sugar until light and fluffy - do not rush this process - beat at least 4 minutes.  Add eggs, one at a time, beating well after each addition.  In a small dish make a paste using the cocoa powder and a small amount of food coloring.  Add to butter mixture and beat well.  Add the balance of food coloring beating well.  Then add flour (mixed with salt) and milk alternately (roughly 4 additions) beginning and ending with flour.  Beat in vanilla.  Lastly combine vinegar and soda in a small dish (it will foam up) and gently stir vinegar mixture into batter, mixing well.

Pour into cake pans and bake at 350 degrees about 30 minutes, or until a tester comes out clean. Let cool in pans 5 minutes, then turn out onto a cooling rack to completely cool before frosting. 

N.B. As soon as cake is out of oven I like to begin preparing the frosting (which takes a little while because you have to heat the milk and flour and allow time for it to cool, etc.) and you want to frost your cake as soon as it has cooled so it will be as fresh as possible.

Frosting:

In a small saucepan whisk together flour and milk until blended and cook over medium heat, stirring constantly until mixture thickens. Set aside to cool.  You can set pan in a basin of cool water to speed along the cooling process.

In a larger mixing bowl cream together the butter and sugar until light and fluffy.  Then add 1 Tbs of cooled milk and flour mixture to sugar mixture, beating well.  Gradually add the rest beating all the time.  Beat in Vanilla.   If you choose to use icing color add it at this time, beating well. The texture of the frosting is similar to whipped cream.   As soon as cake has cooled begin frosting.

Serve with vanilla ice cream.

Good luck!

Until next time be well, love well, and have fun with hat toppers!!!

Thursday, January 25, 2018

Toasty Toes and Other Creature Comforts


I hereby proudly announce my membership in the very first ever Handmade Sock Society! I. Can't. Wait.  It's a botanically inspired subscription that will include 6 secret sock patterns released every other month beginning in February.  As a wee bonus for joining early I also received a free Vintage Fairy Lights pattern that I immediately whipped up into these decadently delicious pink socks.  If you are interested there is an early bird price available until the first pattern is released sometime early February.  Sign up and you too can have toasty toes this winter, and all year long!

Of all the things that I've knit over the years my hand knit socks are worn and enjoyed the most.  There is no comparison.  They are fun to knit and indulgent to wear.  Combined with leggings you have the equivalent of an adult onesie.  Don't judge.  I pad around the house with them on, take naps wearing them, and prop my feet up so they can be admired while I'm watching TV.  In other words they bring me a great deal of creature comfort.

Another creature comfort I've been enjoying  this winter is having a wonderfully cozy shawl hanging about the house to wrap myself up in.  It's my Osmosis shawl (pictured below) and I have a wild coincidence to share with you about this shawl.  The Osmosis shawl designer, iKnit2Purl2, also dyed the yarn that I used to knit my Vintage Fairy Socks.  But I didn't realize that connection when I chose to buy her yarn.  It happened this way.  I had recently finished knitting my Osmosis shawl when I went onto Etsy and by random surfing found this beautiful pink sock yarn.  It wasn't until I looked at my receipt that I realized the same person who had designed the Osmosis shawl had dyed the yarn that I had just bought.  Serendipity.  How could I do anything else but put these two projects together in a post!


PARTICULARS:  Pattern: Vintage Fairy Lights design by Helen Stewart (Curious Handmade); US 1 DPNs; 1 skein Corda Bella Yarns (aka: iKnit2Purl2 ) Ultra Sock (400 yrds (100 gms) SW Merino & Nylon) colorway: Azalea.  I did modify this design slightly.  I kept the raised twisted knit stitch throughout the stock instead of switching to a 3K P1 repeat after the top design was finished.  I think the contiguous raised knit stitch makes it look like balloon streamers are running the length of the stock holding up floating fairy lights!  I loved knitting these socks, both the pattern and the yarn were a delight to work with.  Previous Curious Handmade patterns I've knit are the Botan (shawl) and Shallows (scarf).


PARTICULARS:  Osmosis shawl, designed by iknit2purl2, US 4 needles; 3 skeins Tusken Knits, Fir, (400 yrds merino singles).  My only modification, if you will, is that I only used 3 colors to knit this design.  I simply knit a color until I was close to running out and then switched to the next skein until I ran out.  More or less my color transitions began about 14 rows before the lace segments and then continued through and even after the lace segment.  I ended up using virtually every scrap of yarn I had.  This was a very enjoyable and easy shawl to knit and I love the finished product.  It's similar in design to the very popular Find your Fade shawl but it's uses less yardage (1,200 yrd vs. 1,540 yrds) and hence is a more manageable size which is why I chose to knit it. 


PAIN AU LAIT


As this is a post about creature comforts it has to include a bread recipe.  Because there is no greater creature comfort than enjoying freshly bake bread still warm from the oven!   The recipe I am sharing is fun and easy to make and has a bit of french panache to boot!

The recipe comes from The Great British Baking Show.  Of which I am a huge fan.  As I'm sure is anyone who has ever baked.  Because bakers know that it's a risk to bake for others.  Baking is fraught with perils and pitfalls and you will see both successes and failures in this show. Some of the recipes have been shared online (not all recipes though as it's up to each contestant).  Luckily  Richard from season one shared his recipe for Pain au Lait.  I love his recipe.  It's easy to follow and relatively fast (for bread) and it doesn't require any special skills or tools (although you will need a kitchen scale as all ingredients are by weight).  I hope you will enjoy Richard's Pain au Lait rolls as much as I do!

Until next time be well, love well and I hope this winter you give sock knitting a try so you too can enjoy toasty toes and other creature comforts!

Monday, January 1, 2018

Resolutions and All Things Brioche

Resolutions, resolutions, resolutions.  I generally don't make them.  After all I live a fairly disciplined lifestyle already.  So when I think about resolutions, if I do, it's in terms of crafting goals. And last year I resolved to learn the brioche stitch.  Come hell or high water.  


It wasn't just because there were a number of shawls that I wanted to make that use this stitch.  It was also that I didn't feel I would be a complete knitter until I had mastered this stitch.  And it's not like I woke up last New Year's and decided I wanted to learn the brioche stitch either.  I had attempted it several times over the years and not succeeded.  For whatever reason this stitch befuddled me and simply watching free youtube videos and tutorials wasn't making it any clearer.


So in 2017 I bit the bullet and signed up for a paid Craftsy class!  You have to understand this was a huge mental shift for me.  If there's a free option online then I'm not interested in paying.  For example I would never pay to blog as I get the blogger platform for free.  I'm also not interested in making money from being online either so I guess there's some symmetry there. But as I mentioned I had already gone the free route with this stitch and that had gotten me nowhere.   I turned to the mega online craft class retailer Craftsy and settled on Explorations in Brioche Knitting with Nancy Marchantwho is a renown brioche guru.  And if you are going to learn anything it's best to learn from the best. Especially if you are going to be paying.  And I am delighted to report that this class did the trick for me.  I began with lesson one and worked through the modulus and wallah the brioche stitch wasn't nearly so complicated as it had previously seemed.  I guess sometimes it does pay to pay.


After all that I am particularly delighted to start 2018 by sharing my very first two color brioche shawl!  This pattern is a combination of both brioche and lace stitches and if you look at the picture below you can see the brioche portion is the purple segment which gives the fabric depth and a beautiful tonal effect.  I am not going to lie though the shape of this shawl is awkward and highly asymmetrical.  I would not consider it an everyday shawl but if you want a statement piece then this is the ticket.  All in all I'm thrilled to be wearing it and as a bonus I can call myself a master novice brioche knitter at last!


Particulars:  Parlour Shawl designed by Leslie Anne Robinson (Knit Graffiti Designs), la Bien Aimee skinny singles 1,100 yrds (yarn purchased as a kit); US 4 needles.  I only made a couple very small modifications to this pattern. Because I felt leaving the eyelet of the pattern repeats looked unfinished I closed that eyelet and to make up for the extra decrease I threw in another edging increase. The other modification was to the BO.  Three quarters of the way into the BO I realized that the edge was rolling and hiding the contrasting color so I ripped back and knit another row to create a garter stitch edge.  Then, instead of turning my work I simply slid the stitches to the other end of my circular needles (so the right side was still facing me) and BO in contracting color yarn.  This eliminated the rolling and emphasized the contrasting color.

To see a project that incorporates just a single color in the brioche stitch see my post with a photo of Stephen West's Marled Magic Shawl (the brioche is the grey portion) which also gives wonderful depth and texture to your fabric.

Incidentally I found baking brioche to be easier and oddly satisfying in light of having failed at the stitch.  I use Le Pain Quotident's Brioche recipe from their Cookbook.  They do have a free version of their brioche recipe online but it uses very different measurements from the book and I can not vouch for it (nor are the ratings for that version very high) but if you are interested here's the link brioche recipe.


SUNSETS IN SAN CLEMENTE ~


After the wildfires and a very stressful start to the holidays we were fortunate that things quickly turned around and returned to normal.  The Thursday before Christmas evacuation orders were lifted in Santa Barbara and my parents were allowed to return home and I joined them to help get the holidays back on track.  A few days of dashing about and decorating the tree, shopping, and hanging the lights and we were able to enjoy one of the nicest Christmases ever.  Afterward Steve and I headed to San Clemente to spend a few days relaxing at the beach as we always do the week between Christmas and New Year.  Watching the sun glide below the watery surface is so beautiful and relaxing and one of my favorite parts of staying at the beach.  Except when I'm not paying attention and a rogue wave wipes me out as it did while I was taking this picture.  Yet looking back at the picture I can say without hesitation worth it.  Even if I still have Sand in my Shoes.

Until next time be well, love well and may 2018 bring health and happiness and successful brioche knitting to all!