Showing posts with label Scones. Show all posts

Monday, May 20, 2019

SCONES - the British Way


As an American I've found it a long and arduous journey to find the perfect British scone recipe.  There were many perils along the way from disappointing recipes, confusing measuring conventions, differences in flour composition, and perhaps the most challenging factor, no decent example to be found anywhere.  I've had tea at the Biltmore in Santa Barbara and numerous other posh establishments and never had a cup of tea worth drinking or a scone enjoyable to consume.  While I didn't know how to make a scone myelf I knew enough that the pale, slightly risen, and cold offering was not a proper British scone.  Not by half.  Which is why I made it my mission to figure out how to bake a British scone and why it all goes so wrong in America.

The simple answer is that it's due to the flour.   All purpose flour in England has a higher protein content than in America.  But it's more than that.  I won't lie.  To succeed in America with baking British scones requires yes, the right flour, but it also requires its very own technique which is why I've been very exacting in the instructions below.  Follow this recipe and you'll be happily munching on scones as you watch Wimbledon this summer with butter and jam dripping down your fingers.  Or regularly with a cuppa and a good book, as I do.  Parenthetically I'm thoroughly enjoying the Maisie Dobbs series.

The recipe I'm sharing is my own and derived from a variety of sources including trial and error and serendipitous surprise.  As mentioned above I can not stress enough the importance of using the right flour which, luckily, is lurking at your nearby grocery store.  I actually had self raising flour imported from England (quite expensive) and didn't like the result as well.  Similarly cake flour (which has a higher protein content and is sometimes recommended for British scones) gave disappointing results.  The good news is that Bob's Red Mill Artisan Bread Flour is reasonably priced and available at a variety of grocery chains and, incidentally, makes fabulous baguettes as well.

Without further ado good luck and I hope that you enjoy these scones as much as Steve and I do!

SCONES - the British Way
Yield ~ 9 to 10 scones

INGREDIENTS ~

Either:
1/2 cup currants - soaked 10 minutes in earl gray tea (or plain hot water)
or
4 oz sultanas (golden raisins) (no soaking necessary so long as fresh) - set aside

Combine in a large bowl:
450g Bob's Red Mill Artisan Bread Flour or British self raising flour
If using Bob's Red Mill Artisan Bread Flour add 2 TBS baking powder
If using British self raising flour add 2 tsps. baking powder
1/4 tsp. salt
85g (6 Tbs.) sweet butter - slightly softened (I use a European butter such as Kerry gold) cubed

Combine in a separate bowl (and reserve 2 TBS):
1 large egg plus enough whole milk to make 1 cup
7 Tbs. (92g) fine white sugar  (caster sugar or C&H baking sugar)
1 tsp. vanilla extract

Garnish: Demerara sugar


Steps:

1.  Preheat oven to 500 degrees Fahrenheit and line a baking sheet with parchment paper.  N.B. you will drop the temperature to 425 as soon as you pop the scones in the oven.

2.  If using currants instead of sultanas soak currants in earl gray tea or hot water for approximately 10 minutes and blot dry.   Measure and set aside whichever you are using (either currants or sultanas).

3.  In a medium bowl combine your choice of flour, appropriate amount of baking powder (depending on your flour choice), salt, and cubed butter.  Using your finger tips rub butter into flour mixture until consistency of fine sand.  It is very important that there are no lumps of butter left as you want a cake like consistency and not a flaky consistency like a biscuit. Set Aside.

4.  In a separate small bowl combine egg and milk mixture, sugar, and vanilla.  Whisk until sugar is entirely dissolved.   Remove and reserve 2 Tbs. of mixture to be used later for brushing tops of scones.

5.  Add either currants or sultanas to the flour mixture and toss to combine.

6.  Add the milk mixture (less the 2 Tbs. reserved to brush the tops) to the flour and raisins.  Using a blunt knife cut the wet ingredients into the flour mixture to form a wet and shaggy dough.  Don't worry if not all the flour is incorporated - it's better to not incorporate all the flour rather than having a dough too dry (there are a variety of factors that can affect how much flour is needed to create the dough such as humidity).  Turn dough out onto lightly floured board and kneed a couple of turns until smooth.  Then gently fold dough in half three (3) times to create layers.  Use only a small amount of additional flour to prevent sticking as adding too much will create heavy scones.  Use your hands to pat dough into a smooth round approximately 1 to 1 1/2 inches inch thick.  Do not use a rolling pin as it will overwork the dough.

7.  Using a floured biscuit cutter (2 3/4 inch diameter) stamp out scones using a quick hard stamping motion with the heel of your hand and do not twist the cutter.  Be as efficient as possible in cutting as many scones from this dough, as the scones made from the re-rolled scrap dough are not as nice. Place scones on prepared baking sheet and transfer to refrigerator for 30 minutes (which allows the baking powder to begin work and keeps dough cool to prevent spreading).

8.  Just before placing scones into oven brush tops with reserved milk mixture.  Only brush the tops (not sides).  Finish with a sprinkle of demerara sugar or similar course baking sugar.

9.  Drop oven temperature from 500 to 425 degrees and bake 7 minutes and turn pan.  Continue to bake scones an additional 7 minutes (a total of 14 minutes) or until dark brown on top.

Scones do not keep well and are best served warm from the oven when they are absolutely divine.  Contrary to the Brits I enjoy mine with strawberry jam and a spot of sweet butter but for the real deal use clotted cream and/or whipped cream (I find clotted cream at Gelson's Grocery Store).  Once cool freeze the leftovers and I find they are best briefly microwaved (30 seconds) and toasted in a warm oven.


If traditional British scones are not your cup of tea you might enjoy previously shared recipes for Irish Scones and/or  Almond Scones (these scones are easy and delicious and this post includes my mother's tips for brewing a perfect cup of English tea).


And There Has Been Knitting ~


As regular readers know this has been a sad year for me with the passing of my father and my mother relocating into assisted living.  There is still much to be done not least of which is the closure of all the loose ends from a lifetime (60 years) that my parents spent together.  But time passes and it gets easier.  It's been a reminder for me that nothing in this world remains the same.  And my faith is stronger for it.

Throughout it all I continue to knit.  But I won't pretend this shawl is fresh off the needles as it was finished last Spring and there are many other more current projects.  But I wanted to show this shawl as it's been a really useful addition to my wardrobe. Every once in a while I'll pick a design for it's simplistic beauty, as in this case.  Although it was a fairly challenging knit and required close attention to the pattern the payoff has been worth it and I don't believe it would be a problem for an average knitter with determination.

Particulars:  Rheinlust designed by Melanie Berg; 2 skeins Ella Rae Lace Merino (920 yrds).  I was concerned about having enough yarn and only knit 8 repeats of Chart B and ended up with 4g yarn remaining.  Final blocked measurements 20" x 73."  A previous pattern of Ms. Berg's that I knit was her Qwist Mitts.


Until next time be well and love well and may all your scones be sweet ~

Sunday, July 28, 2013

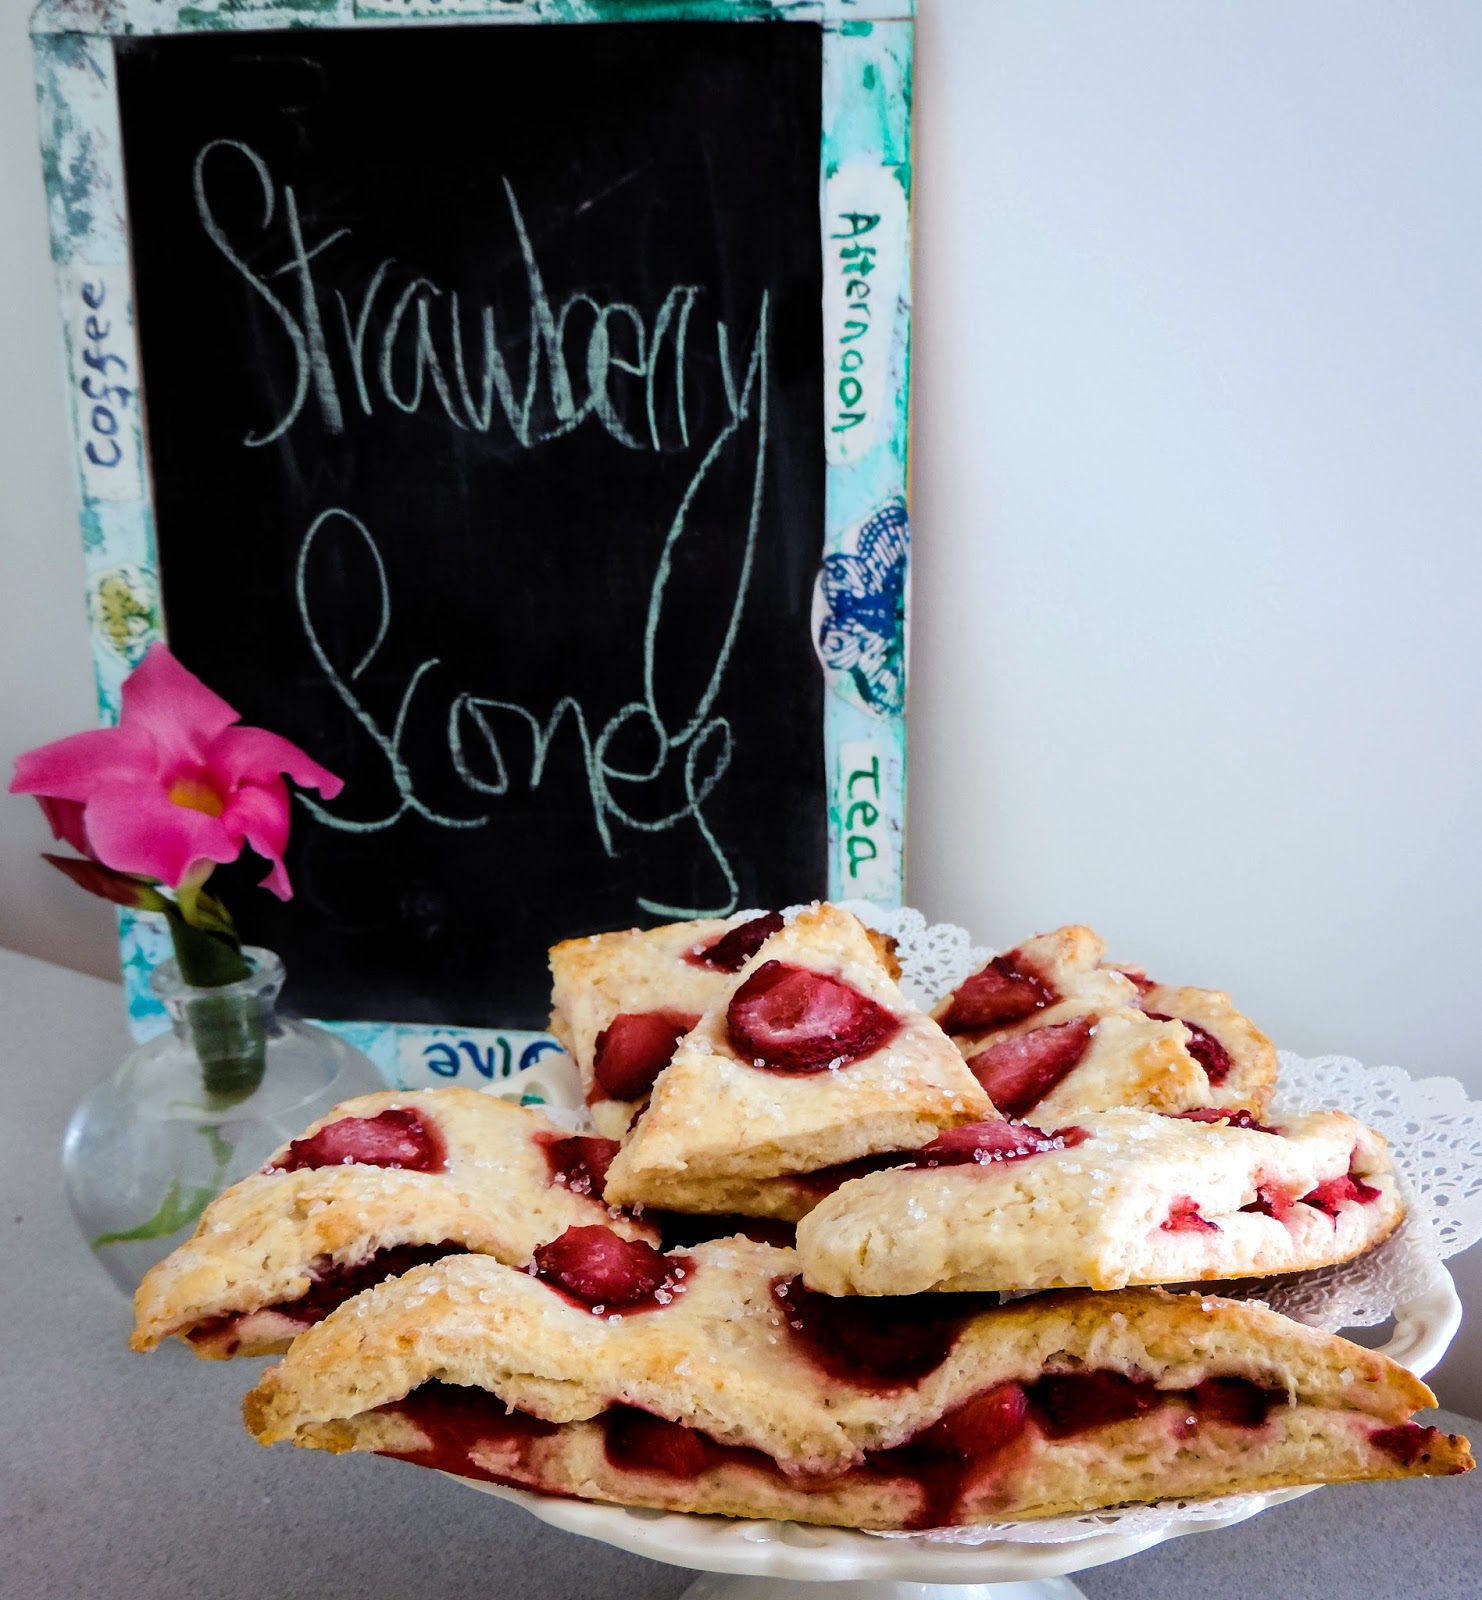
Simcha's Simply Scrumptious Strawberry Scones ~


I don't know if you've noticed, but so far it's been a particularly hot summer and I just couldn't bear to talk about knitting.  So instead I'm changing things up with some baking!  These strawberry scones are inspired by scones served at the Sweet Begonia Bakery in Santa Barbara, California located in Victoria Courtyard (just off State Street).  I really really really liked the Sweet Begonia scones but as I don't live in Santa Barbara what was I to do?  I had never seen anything similar in a Los Angeles bakery and I had no luck finding a similar sounding recipe.  But I was not going to be defeated and, as they say, necessity is the mother of invention so I put on my thinking cap and created a recipe that I call Simcha's Simply Scrumptious Strawberry Scones.  I do use "scone" loosely as this is a cross between a cookie, shortcake, and scone.


Any leftover strawberries can be used to make a refreshing lime and strawberry iced drink to sip as you contemplate fall knitting projects (I love an elixir made from a mix of squeezed lime and strawberry juice poured through a strainer and diluted with water and sweetened with agave nectar and poured over ice).  I currently have a ton of fall projects on the needles as it's never too soon to start!


Simcha's Simply Scrumptious Strawberry "Scone" Recipe

2 cups all purpose Flour
1/4 cup granulated sugar
1 tsp. baking powder
1/4 tsp. salt
3.5 ounces almond paste crumbled (1/2 tube) note: almond paste is similar but different than marzipan and   is generally carried by grocery stores in the baking isle next to marzipan.
5 tbs. cold unsalted butter (cut into pieces)
3/4 cup - scant - whole milk (do not substitute low fat milk)  This is a wet dough but still shouldn't be too sticky to work with so be cautious with the amount of milk added.
1 pint fresh strawberries (organic) - dried thoroughly and sliced into flat slices
***
rice flour or all purpose flour to dust work space
Garnish:
milk
coarse white sugar

Steps:
1.  Preheat oven to 400 degrees and cover a baking sheet with silpat or parchment paper.
2.  Combine dry ingredients and mix in crumbled almond paste.
3.  Using a pastry cutter add butter to the dry mixture and use pastry cutter until butter is pea sized or smaller.
4.  Quickly stir in whole milk to make dough.  If your dough is too "wet" add a small amount of additional all purpose flour until it is no longer too sticky to work with.  Turn dough out onto work surface lightly dusted with rice flour or all purpose flour.  I like to use rice flour because it's very "white" and gives a nice finished bakery look to your scones.
5. Using a rolling pin roll dough into a flat circle (as if rolling out a pie crust - approximate 1/4 inch thick - makes a 13" diameter circle).  Use a knife to cut circle in half and cover one half of the dough with sliced strawberries and then fold the other half of the dough over on top of the strawberries and gently press down.  Again using a knife cut half circle into scone sized wedges and decorate tops of scones with remaining slices of strawberries (makes approximately 8 to 9 scones).
6.  Using a spatula transfer scones to prepared baking sheet.
7.  Brush tops of scones with milk and sprinkle with coarse white sugar.
8.  Bake approximately 20 minutes or until dough is lightly browned.  Cool on wire racks. These freeze well.

These are a rustic style scone (as mentioned above I use the term "scone" loosely) and go well with coffee or tea and I hope you enjoy them!

And for those who like to keep tabs on Simcha  ~

Simcha is still a high drive boy who enjoys needs hikes daily (twice) and I defy you to find a dog that likes to chase a ball more.


Until next time, be well and love well and take time to bake scones, drink crazy fruit juices and have fun this summer!

Monday, June 8, 2009

Put the Kettle On ~ It's Tea Time!

Tips on brewing a proper cup of tea and Almond scone Recipe 


I have come to believe that there are many who do not know how to brew a proper cup of English tea. So I have come up with a list of helpful tips. Upon what do I base my authority? My Mother, who is a genuine English Rose, born and raised in England with much of her youth spent in Teignmouth a small coastal fishing town in Devonshire. Her home was right on the water and when the tide was high the waves would reach the back steps. The air was filled with the smell of saltwater and the cries of seagulls overhead circling and diving and fighting for space on the windowsills.

My mother remembers the day in 1940 when all the local fishing boats disappeared from her town. They were participating in England's call to civilians to mount what was one of the most heroic and amazing rescues of WWII. Fisherman in small fishing boats from all over England joined the British naval fleet and braved dangerous seas in the Channel and enemy attack to bring home allied troops who were stranded on the beaches of Dunkirk and surrounded by Hilter's army. The smallest boat to engage in this rescue was an 18 foot open fishing boat. Many of the soldiers were rescued directly off the beaches wading into the water to the smaller boats that transported them to the larger ships amid machine-gun fire, bombing and explosions sending shrapnel flying everywhere. While many were killed or captured, many more were rescued. It was a pivotal moment early in the war and could have resulted in a catastrophic loss. Churchill had only expected to evacuate 20,000 to 30,000 troops. Instead, 338,000 were rescued that day. It's a memory that still brings tears to my mother's eyes.


But enough about that. Back to tea a much more congenial subject. To properly enjoy a cup of tea it must be made correctly. I think it is often assumed that you simply have to dunk a tea bag into a cup of hot water and whollah, you have tea. This, of course, is totally wrong and will result in a terrible cup of tea that tastes like dishwater and is not at all related to the rich, mellow, satisfying brew that tea should be. Therefore, at the risk of being too simplistic, I have made a list of tips (with my mother's input) to take the guesswork out of making a proper cup of tea.

Mr Puffy's Ten Tips to Brewing a Perfect Cup of Tea ~ and Where It Can All Go Wrong:

Tip No. 1. Select the right teapot. Tea must be brewed in a vessel (teapot) that holds heat well. Clay or fine bone china works best - but avoid ceramic as it does not hold heat well. I use a variety of teapots including the chintz styled one pictured above which is made by Arthur Wood & Son, Staffordshire, England.

Tip No. 2. Select a good quality black tea. This is a personal preference issue and you might have to experiment with a few. For an everyday tea my favorite is Taylors of Harrogate - Yorkshire Gold. I am fortunate to have several British shops nearby in Santa Monica, California which carry this tea. In fact, the Tudor House not only has a nice selection of British imports it also has a tea room which is a nice place to sit and enjoy a cup of tea if you ever happen to be in the neighborhood.

Tip No. 3. Use the right ratio of tea to water. While this is largely a personal taste issue, a good rule of thumb is 1 tsp. tea to 8 ounces water.

Tip No. 4. Use water that has reached a rolling boil. The water has to be at a rolling boil to make a good cup of tea. Merely heating the water until a few bubbles appear is insufficient. For those of you who do not work from home, an electric kettle can be used to boil water at the office.

Tip No. 5. Tea must be steeped. The term "steeped" is a fancy way of saying allow the tea to brew undisturbed. A standard black tea should be steeped for approximately 5 minutes.

Tip No. 6. Use only fresh tea. Unlike wine, tea does not improve with age. Check the dates on all your tea and if is over 6 months old, toss it out.

Tip No. 7. Use a fine bone china teacup. Rummage through your cupboards and look to see if any of your mugs or teacups are stamped "fine bone china." Fine bone china holds the heat well and is a pleasure to sip tea from. It simply is the best for tea.

Tip No. 8. Only add whole milk. Using a low fat variety simply won't give you enough body. The good news is that you use very little milk in a cup of tea.

Tip No. 9. Keep your teapot warm. If you don't have a tea cozy, simply wrap your teapot in a tea towel which works just fine in a pinch.

Tip No. 10. Enjoy with a scone or shortbread cookie, but nothing too sweet. Below I have shared a recipe for Almond Scones which is a staple of my tea time.


ALMOND SCONE RECIPE

This recipe came in a King Arthur Flour free catalogue a number of years back. I've made it countless times over the years and I like it because it's not as plain as an English scone and not as over the top and heavy as most American style scones.

Ingredients:

2 Cups King Arthur Unbleached All-Purpose Flour
1/2 cup almond flour or 1/2 cup finely ground almonds
1/2 cup sugar
2 1/2 teaspoons baking powder
1/2 teaspoon salt
6 tablespoons cold unsalted butter
1/2 cup milk
1 1/2 teaspoons almond extract
3 to 4 tablespoons sparking white or demerara sugar for topping

Steps:

1. Preheat oven to 425 degrees.
2. In a medium-sized bowl, whisk together the flour(s), sugar, baking powder and salt. Cut in the butter until coarse crumbs form. Blend the milk and almond extract in a measuring cup, then drizzle over the dry ingredients. Toss lightly with a fork until the dough comes together; add up to a tablespoon additional milk, if necessary, to form a cohesive dough.

3. Turn the dough out onto a lightly floured work surface and fold it over gently a few times. Pat it into a 6x8, 1/2 inch thick rectangle. Use a deep cookie cutter to cut the dough into circles or heart shapes. Place the scones onto a parchment-lined baking sheet (I use a silpat mat).

4. Brush with milk and sprinkle with sparkling white sugar crystals. Bake for 10 to 14 minutes, until a light golden brown. Cool on a rack. Yield 6-10 scones. I typically divide my dough into 8 scones.

These scones are wonderful warm with butter and strawberry jam. But for an extra nice treat I like to eat them with strawberry jam and whipped cream, which is a wonderful substitute for clotted cream.

Whipped Cream Topping

Simply whip heavy whipping cream with a drop of almond extract and a teaspoon of sugar until a thick spreadable consistency. This can be made several hours in advance.

Why Tea Time Now?

I'm sharing these tea tips at a particularly opportune time as tea time in the Summer can be a wonderful way to share time with friends sitting outside in the shade of your garden or by yourself with your feet up watching that fine old tradition of Wimbledon Tennis. Either way, I hope you will enjoy a cup or two of tea this Summer and if you have any tips to share, I would love to hear them!

Saturday, October 20, 2007

Irish Scones ~


We have been away for a few days and it is wonderful to be back home with my feet up enjoying hot buttered scones and a good cup of tea! These scones are a staple of my tea time and they are really pretty easy to fix once you have the proper ingredients. You will note that I suggest pre-soaking the raisins in brandy. In my opinion, most desserts are improved by adding a little liquor!

RUSTIC IRISH SCONES Recipe

(Adapted from a Saveur recipe March 2003 issue)

3 C. All Purpose Flour (King Arthur Flour is the best)
¼ C. superfine baking sugar (you can increase to 1/2 C. if you prefer)
1 tsp. baking powder
8 tbsp. unsalted butter (I like to use Kerry Gold Irish Butter – but any European butter is good)
6 tbsp. sultanas (golden raisins)
½ C. + 6 tbsp. whole milk (just under 1 C.)
1 egg + 1 tsp. water (egg wash)
Demerara sugar for garnish (optional)

Steps:

1. Soak raisins in brandy, if you plan ahead. Otherwise just use fresh plump raisins.
2. Preheat oven to 400 Degrees.
3. Whisk flour, sugar, and baking powder together in a large bowl.
4. Using pasty cutter, cut butter into flour mixture.
5. Stir in Sultanas (golden raisins).
6. Add milk and stir until dough just comes together. I then quickly kneed the dough right there in the same bowl. Tear off chunks about the size of a dinner roll. Don’t worry about creating fancy looking scones – these are supposed to be “rustic” in appearance and are much better for not having too much handling. One batch makes approximately 8-9 nice sized scones.
7. Plop scones on baking sheet and coat with egg wash (I simply use a paper towel dipped in the egg mixture).  Sprinkle liberally with Demerara Sugar
8. Bake for approximate 25-30 minutes – they should be nice and golden brown.  Scones should be baked until the sugar is almost carmalized as this creates a wonderful crunchy crust.
9. Serve warm with lots of butter and a good marmalade.  If you add the additional sugar to the dough these are sweet enough to eat plain.
10. Enjoy regularly!